Showing posts with label self sufficiency. Show all posts

Friday, April 22, 2011

You can bake! And the ultimate pizza dough!

Since last fall, we've been baking all our own bread.  There's always a loaf on the counter or dough in the fridge (and usually there's both!).  Baking bread is so easy, and not at all the time consuming task non-regular bakers think of.  Baking seems to be enjoying a bit of a renaissance these days, and I want to spread the good word!

Bread Basics
Great bread is all about ratios.  Stick to the correct ratios, and you really can't go wrong!  The magic numbers are these: 1.5, 1.5, 3, 6.5.  That's 1.5 Tbsp yeast, 1.5 Tbsp salt, 3 cups water, and 6.5 cups flour.  It's so simple it's crazy!  And you can follow the same numbers for substituting, as long as the total numbers stay the same.  (Don't substitute anything for the yeast or salt, those are key ingredients!)  For example, I like a softer sandwich loaf, so I do 1.5 cups water and 1.5 cups milk.  As long as it's 3 total cups liquid, you're good to go.  Same goes with flour (though I don't recommend using more than half whole wheat, it makes for a very dense loaf).  I also like adding some sweetener (usually honey), but that doesn't follow a set ratio; I usually add a couple tablespoons of honey, I don't really measure (but it's not crucial to measure it).  Same goes for adding a fat (butter, oil).  I usually just add a few tablespoons.  

Mixing Method
In a large bowl (or a large stand mixer with a dough hook), add the liquid (room temp or slightly warmer, not hot but not cold), yeast, and salt, (and fat and/or sweetener if you're using it) and stir to dissolve the salt.  Then add in 6 cups of flour, and mix it all together with a wooden spoon (or on slow speed) (add the last .5 cup flour if it's too wet).  You want it to be fairly wet, but dry enough to feel elastic.  Don't mix with your hands if you can avoid it- this often leads you to add too much flour.  The dough should still be pretty dang sticky.  Cover it with plastic wrap, and let it sit for about 2 hours.  Don't worry about punching it down, or whether the volume doubles or triples.  It doesn't matter! The yeast knows what to do!  If you're not ready to bake after the 2 hours are up, pop it in the fridge.  It is wet enough to last several days to a week!
Elastic enough to form a ball, but the shape shouldn't last long!

Baking Time!
After the 2 hour rising mark, you're ready to shape.  This recipe works best for free form 'artisan' style loaves, rolls, etc.  (See below for sandwich loaf variation)  Flour your hands and your work surface liberally, and flour the top of the dough.  Liberally sprinkle corn meal on a baking sheet.  Grab a good hunk of dough, form it into a ball, and place it on the corn mealed baking sheet.  Allow to rise uncovered for half an hour.  A few minutes before baking time, preheat the oven to 450 degrees F.  Melt a tablespoon of butter (salted or unsalted, your choice) and gently brush the surface of each loaf.  Bake for at least 30 minutes, but possibly as much as 45, depending on the size of the loaf.  The top should be crisp and browned, not just golden.  Trust me, it's way better to overbake than underbake!  Allow to cool completely before slicing, if you can resist!

The Ultimate Pizza Dough
This recipe follows the same ratio, only on a 2/3rd smaller scale, and will make a beautiful big and fairly thick pizza (after all, delicious dough deserves a thicker crust!).  Follow the above ratio if you would rather make two medium pizzas, or one large and some breadsticks, etc.  

2 cups water
1 tbsp yeast
1 tbsp salt
1 tbsp sugar
2 tbsp olive oil
4 cups flour (I think it's best half white flour half whole wheat!)

Combine the first five ingredients as directed above, then add flour and mix and allow rise as directed above.  After the 2 hour rise, you're ready to shape your pizza.  You'll need a LOT of flour on your work surface and hands and rolling pin.  Preheat the oven to 450, and prepare your toppings.  Cover a baking sheet very liberally with corn meal.  Roll out your dough, flipping it over and adding flour to keep from sticking as needed, until it's as large and thick as you'd like it (for me, as big as my baking sheet will allow!).  Spread sauce, cheese, and toppings as desired, and bake for about 20 minutes until the cheese is hot and bubbly and the crust is golden.  Enjoy!!!

My Favorite Sandwich Bread

1.5 cups warm water
1.5 cups milk
1.5 Tbsp yeast
1.5 Tbsp salt
3 Tbsp honey
4 Tbsp unsalted butter, melted
3.5 cups all purpose flour
2 cups whole wheat flour
1 cup oat flour
1 cup rolled oats

Add first 6 ingredients as directed above, then add the flours and oats and mix.  Add either flour or liquid until it is elastic but still sticky.  Allow to rise as directed above.  After 2 hours, grease or spray a loaf pan with a neutral flavored oil.  Flour your hands and the top of the dough, and pull out half of the dough and form into a ball.  Stretch the ball slightly to elongate, and place in the prepared loaf pan.  Allow to rise another 45 minutes, uncovered.  (Do the same for the other half of the dough if you have two loaf pans. If not, you can make rolls, or refrigerate it for another day!)  Preheat oven to 450.  Melt a tablespoon of butter and brush the top of the loaf, and bake for 40 minutes or until deeply golden/browned.  This time, definitely wait until completely cooled before slicing.  

Friday, April 15, 2011

You can grow potatoes!

This post is the first in a series of 'you can do it' type stuff for the garden and whatnot!  We have a number of friends who have become interested in starting to grow their own food, and have asked us for advice on how to get started, so we thought that this would be a great way of helping people learn how to do it!  I would love if you read this post (or any of my posts) and think of someone who would appreciate it, that you pass a link on to them!  Often times starting a food garden for the first year can be a really daunting task, and a lot of gardening books and articles make it seem more complicated than it needs to be.  We hope to be able to spread the knowledge around so more people can learn to grow and enjoy their own food!!!  And so, we start with potatoes!

Though we've been growing food for about 6 years now, we only just did a potato crop for the first time last year, and it was a complete success!  Potatoes are extremely easy to grow, have great yields for very little effort, and are an excellent staple crop that is very easily stored.

Preparing to plant!
Potatoes will grow just about anywhere- in containers, in old tractor tires, in hay, in your compost pile, or any ol' garden bed.  The easiest way (apparently, we haven't tried it yet but want to!) is to just stick them in a mound of hay, let it do its thing, and come harvest time you don't have to work it out of the dirt, you just pull potatoes right out of the hay!  The only rule you really need to follow is making sure none of the potatoes are exposed to light.  Light turns potatoes green, and the green part is slightly toxic.  The way we prefer to plant them is in dirt, in a slight hole (rather than a mound), and cover the dirt with a good bit of hay.  As the tubers grow, if any peek up through the dirt, you can just add more dirt or hay to keep them in the dark.  Anyways, getting ahead of myself here.  All you need is some good, loose soil, and they'd love some compost if you have it (or can buy it).

And of course, you need some potatoes!  You can buy "seed" potatoes at garden stores or online nurseries, which are no different from what you'd buy at the grocery store, except they are probably already sprouting out the eyes.  If you can't find true seed potatoes, you can use potatoes from the grocery store, but you're better off buying organic potatoes (better chance that they are not a hybrid variety; you can't save seed from hybrids to use for next year). (If you buy potatoes from the grocery store, wait until they sprout before you get ready to plant them.  Some store bought potatoes are treated with an anti-sprouting spray.)  Last year we grew organic Russian Banana fingerlings.  This year we are trying Yukon Golds.  Larger potatoes (like Russets) need a longer growing season, so keep that in mind when choosing a variety.

24 hours before you want to plant them in the ground, you will need to cut the potatoes into pieces, with about 3 eyes per piece.  Let them sit overnight in a bowl or paper bag to allow the cut edges to dry, which will protect them from molding in the ground.

Planting day!
The best thing about planting potatoes is that you really can't screw it up.  As long as the ground isn't frozen anymore, you're good to go.  Roots and seeds know when the time is right for them to start growing.  If it's too cold for them, they won't grow until it's warm enough.  Smart, huh?  On planting day, you'll want to dig a hole about 3" deep, and the width of your shovel.  Put one piece of potato in each hole, and make each hole about three feet apart.  The spacing might seem wide, but trust me, the foliage will get huge, and the potatoes need lots of room!  If they cant grow outwards, they'll grow down, which means more digging come harvest time.  Fill the hole back in with the dirt, add some compost if you've got it, and cover with about 2" of hay just over the hole (you can find bales at feed stores, which will have the best certified seed free hay).  If you don't want to use hay, you'll need to plan the potato a few inches deeper in the dirt.  If you want to do them in containers, you'll need a quite wide container, as there needs to be plenty of room for those potatoes to grow!

The Waiting Game...
Different varieties take different lengths of time to get to harvest time, but the time between planting and harvest is really pretty easy.  Keep them watered, don't let the soil get bone dry, and if any tubers start peeking out into the light, cover them up with more dirt and/or hay (Hay is easier cause it's a whole lot easier to remove at harvest time than a whole lot of dirt!).  Potato foliage is beautiful, the flowers are really pretty (not all plants will flower, so don't freak out if yours don't), and some will even form little seed pods that look remarkably like tomatoes.  But BE FOREWARNED!  ALL parts of the potato plant EXCEPT the potatoes themselves are POISONOUS!!!  Potatoes are a member of the nightshade family, so if you have a curious kiddo who happens to like green tomatoes, keep an eye on them that they don't stick a potato seed pod in their mouth (been there, done that with Wyatt!).
Potato blossoms!

Their foliage is so big and beautiful! (That's only about 5 plants!)

Harvest Time!!!
When the summer is waning, the foliage of the plant will start to yellow- that means it's harvest time!!!  You don't have to worry about frost as long as they are in the ground.  You probably want to get them out of the dirt before it snows, but that's more a matter of convenience ;)  When you harvest, it's easiest to cut the foliage down so it's out of your way, and pull away the hay (it's all great for your compost pile!).  Be very careful as you dig, because scraping the skin of the potato will shorten the length of time you can store it.  The easiest way to safely loosen the dirt is to dig in a wide circle around each plant, loosening the dirt with a spade (like you would do to till a garden bed), but be careful when you put the shovel into the ground, push it in slowly so you don't chop a potato in half.  Then, it's a bit like a treasure hunt!  Break up chunks of dirt by hand, and be sure to go through the dirt all around the plants, because stray potatoes might have decided they liked a bit of privacy and gone deeper or further to the side of the plant than you might expect.  Once you think you've gotten them all, dig a little deeper just to be sure.  If you've planted in containers, you might even dump the whole container out on the ground to get every last little tuber.  Discard any potatoes with lots of green on them.  If there are potatoes with just little bits of green on an end, you can still eat those, just cut the green bit off before cooking.

Unfortunately, you probably don't want to cook a potato straight out of the ground.  They will be much better, and will do better in long term storage, if you let them dry in darkness for several days up to several weeks, to dry the skin (don't wash them!!!).  We put ours in cardboard boxes in layers between newspapers, and stuck them in the closet.  After this time, they are ready to eat and store!!!

Storing your harvest
Potatoes do best in darkness and dry coolness, in a very well ventilating container.  Brown paper bags are not ventilated enough, unfortunately... Wood boxes are probably best.  You can also store them in sand, or burlap sacks, though I don't recommend buckets, even with loose lids.  That's what we did, and all the potatoes we saved for seed to plant this spring ended up liquefied.  GROSS!  If you don't have a cool garage or basement, a dark cabinet will do, but if you have a big harvest, you'll need to find a cool space to keep them.  Don't put potatoes in the fridge though!!! Too cold, and the starch will turn to sugar, and while I love sweet potatoes, a sweet regular potato is not so tasty...  Only wash potatoes right before you cook them.

Last year, we planted 10lbs of potatoes in 48 holes, had 46 plants come up (We think the two that didn't grow were dug up by the dog), and got 55lbs of potatoes from those 46 plants.  Pretty freakin awesome!!! This year we are planting 20lbs!  Yay!!!

One of many boxes of our Russian Banana Fingerlings! Yum!!!

This is a case of mistaken identity...

Well, two weeks of chicken ownership has been wonderful! We didn't lose a single chick, no health issues, they grew so fast, and are nice healthy birds! But unfortunately, not all of them were the birds we wanted... We *thought* we had 12 Buff Orpington chicks, and thought the 8 darker ones maybe just had different parents or were just darker birds or something... Well, as they grew, so did their feathers, and as their feathers came in with patterns, we realized something wasn't right... It took until they were very nearly 2 weeks old before we were able to positively identify the 8 darker birds as Rhode Island Reds, a very beautiful breed no doubt, but not the right breed for us.  For one, they aren't as cold hardy and wouldn't do well in the winter here, and for two they are prone to be a more aggressive breed, and probably wouldn't get alone with the 4 Orpingtons we did have once they got older.  But thankfully, thanks to Craigslist we were able to find the Reds a new home, and take the 4 Orpingtons to Red's mom Kayla, and get 8 new Buff Orpington chicks for ourselves, all in one day!  Ca-RAY-zy!  So now we have 8 weeny teeny little yellow puffballs (and yes, this time they ALL are Orpingtons!), they are 4 days old today (or thereabouts, we got them on Wednesday, and are assuming they were day-olds then), and already have grown quite a bit.  It really is remarkable the difference in their behavior even at this tender age compared to how the Reds were, the first batch of chicks were constantly peeping and chirruping, but this batch is quite quiet in comparison!  They aren't as fond of being fed special treats (cracked wheat and oats) by hand by us yet, whereas the Reds weren't too shy of a hand full of treats, but these are much more tolerant of being picked up and held, whereas the Reds were very skiddish even at 2 weeks old of a hand without treats... Anyways, this new batch are healthy and doing well, and we're excited to get our flock right the second time ;)

(On a personal note, today is Wyatt's 3rd Birthday!!! My poor baby boy is so sick with a nasty tummy bug, and we've had to postpone his party, but we still have special stuff to do with him tomorrow even if he can't have friends over :(  Poor kiddo!  I think Red and I are more upset about it than he is though!)

Wednesday, March 30, 2011

Here chickie chickie chickie!

Today we grew our family by a whopping 12 teeny little girls!  No, I didn't just have duodecuplettes (PHEW!), we got CHICKS!  12 adorable teeny fuzzballs, all Buff Orpington pullets (female chicks).  We've been planning for some time now to get chickens, but weren't sure if we wanted to go with day old chicks (like these) or juvenile pullets, or even if we could find laying hens locally, but after no luck of finding free hens, and no luck finding pullets of the breed we wanted, we decided to go with chicks!  And luck have it, the local feed co-op has Buff Orpingtons!  We picked them up this morning, and they are happily chirruping away in their brooder box in our living room.  They'll live in this box for at least the first few weeks, as they need constant heat heat heat!  The first week, we have to keep them at around 95 degrees!  Fortunately this is easily done with a couple 60 watt incandescent bulbs and some nice dry warm and insulating wood shavings for litter.


Bean and Tig are both absolutely entranced, clearly they think this is the best thing that has ever happened here... Though the chickies are nice and safe in there!  Wyatt is excited too, and all of our new favorite activity is just sitting and watching them!  I am so excited to watch them grow, get to know their personalities and quirks!  No names for them yet, for one they're very hard to distinguish from one another (and will continue to be, as their feathers will be in a constant state of change for the next few months!).  They will begin laying in about 5-6 months, so come early fall we'll be enjoying delicious eggs!  Three of the twelve will go to Red's mom when they are about 6 weeks or so, past the fragile chickie stage and well on their way to being big girls!  Buff Orpingtons are a heritage breed, originally bred in England in the late 1800's.  They're a heavy breed, hens reaching around 8lbs at maturity, and they will lay large light brown eggs.  They're very cold hardy, and have small combs and wattles (the floppy things on their heads), and that's a good thing cause the bigger the combs and wattles are, the more prone they are to frostbite.  Here's a shot of a mature hen- (borrowed from pluckandfeather.com) 

Thursday, March 10, 2011

Sprout-tastic!

This winter, we got a sprouting kit put together for us by Red's mom Kayla!  We both realized we missed salads and fresh greens SO badly, and storebought lettuce was remarkably disappointing after the awesome lettuce and greens we grew ourselves last summer.  Kayla has been sprouting for a long time, and helped us to get started with an awesome kit she assembled for us for Christmas.  Sprouts are delicious, crazy easy to grow, and amazingly nutritious.  It's a great way to get home grown nutrition in the winter!  Here is how we grow ours, but be sure to check out sproutpeople.org for everything you could possibly need to know about sprouting!  (They also carry seeds, sprouting equipment, all sorts of good stuff!)  

All we use to grow our sprouts are wide mouth quart sized mason jars with a small circle of non-metal window screen and the screw band that goes with the jar.  Other than seeds to sprout, that is all you need!  We have a great seed mix from sproutpeople.org that we LOVE that includes clover, arugula, cress, fenugreek and dill seeds.  It is the perfect mix, and tastes amazing on sandwiches, in burritos, and even by itself with a little dressing!  We tried sprouting mung beans, but didn't like the flavor, so now we stick to this seed mix.  To grow a quart of sprouts, it only takes about two tablespoons of these seeds, so it's a great value by volume!  

Step 1- Soak em!

First off, measure out your seeds according to the variety (different seeds will grow different amounts, so check on sproutpeople.org for how much to use so you get a good amount of sprouts but don't end up with an overstuffed jar).  Put the seeds in the jar, put the screen over the top and screw on the band.  Fill up the jar (through the screen) with cool water and let the seeds soak 8-12 hours (or however long is needed for the variety you are using, again, see sproutpeople for individual seed instructions).
Our favorite seed mix has some pretty small seeds, so we use two layers of screen until they begin sprouting and become big enough not to fall through the screen.

Step 2- Rinse, Repeat! 

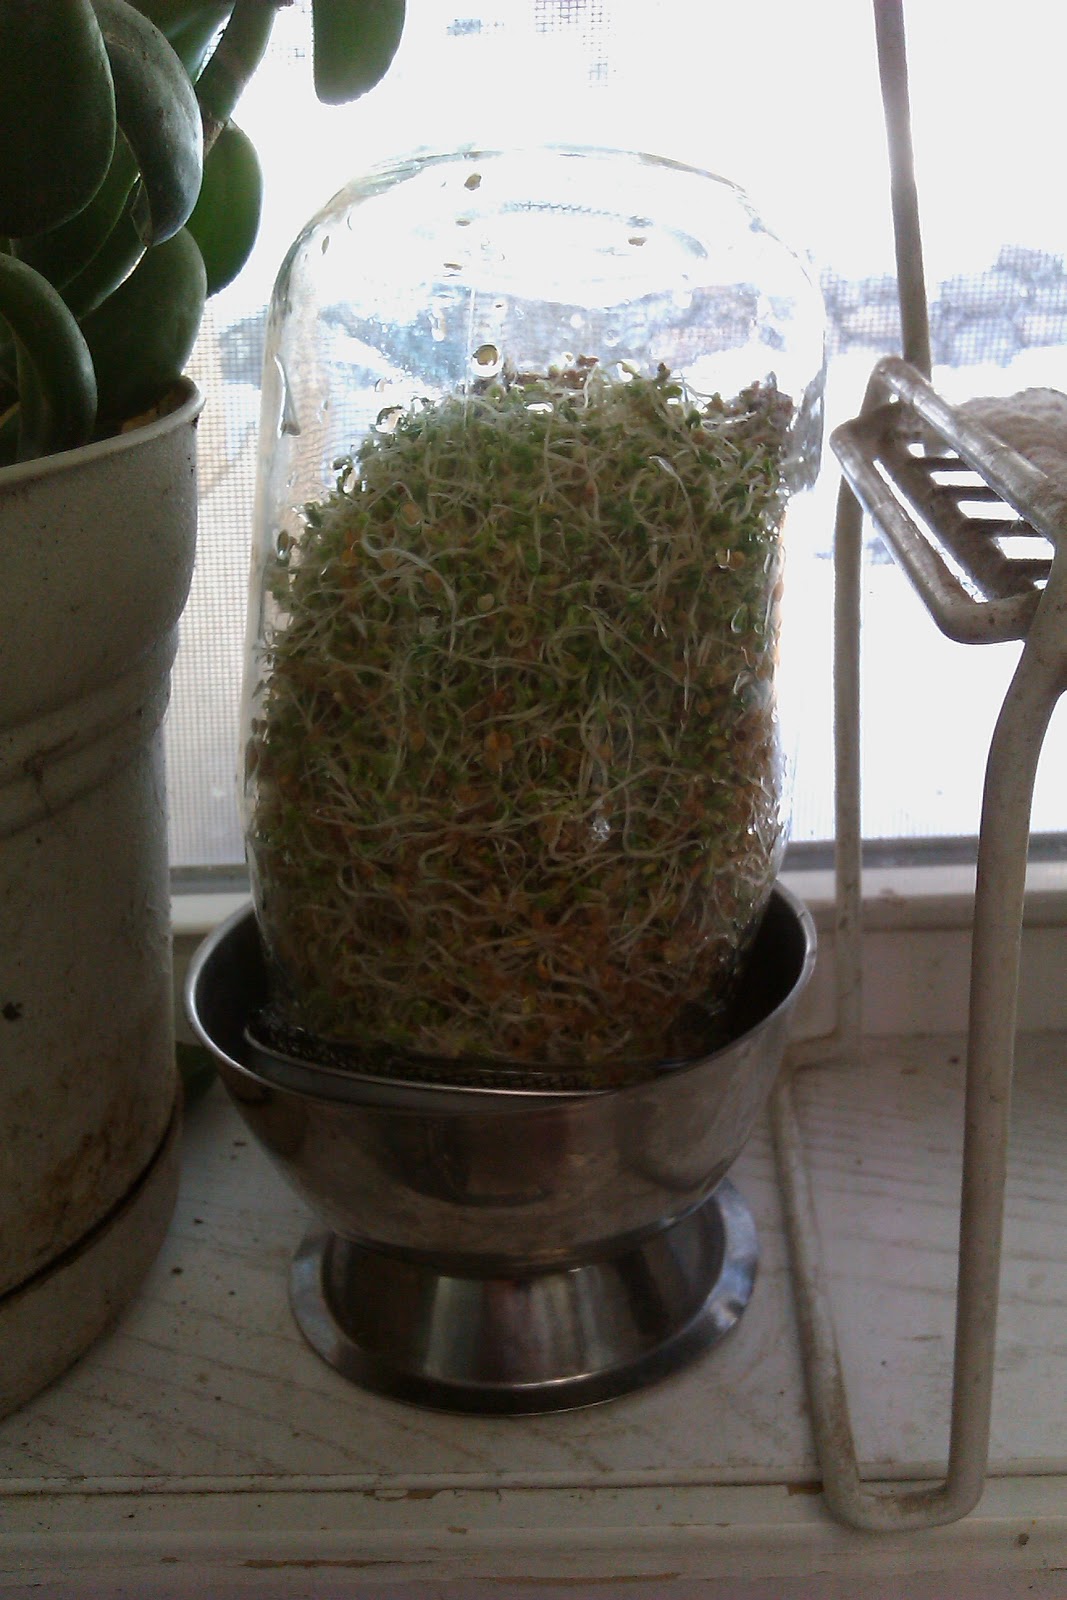
After your initial soak, drain the water out, fill with cool water, and swirl it around to make sure every little seed gets wet, then drain it off again, getting as much water out as you can.  Then tip the jar upside down and set it at an angle in a bowl, which will allow any leftover water to drain out without leaving the seeds too wet, and allow good airflow.  We keep ours on our kitchen windowsill, so we don't forget about rinsing them!  It doesn't get any direct sunlight this time of year so it's ok for us, but don't put your jars in direct sunlight.  I do recommend keeping them in or near the kitchen, so you'll be less apt to forget about them! 

   Rinsing; The first signs of growth, day 2

Repeat the rinsing and draining every 8-12 hours or so.  Doesn't have to be spot on timing wise, but you don't want the sprouts to dry out completely.  Since we keep ours by the sink, we usually rinse them in the morning while coffee is brewing, and again around dinnertime.  You will start to see the first signs of growth about 36 hours after you first put them up to soak (or sooner or later depending on the variety of seed).  At first the sprouts will be short, spindly and white, but once they get started, they really take off!  You'll notice the hulls of the seed start to fall off once the leaves start to form, around day 4-5.  
Here are our sprouts at about day 5. Notice the brown hulls of the seeds- they fall off on their own, but are still edible.  We don't bother with separating them out, though most end up in the bottom of the jar anyways.
We keep two jars going at different intervals to keep a steady supply of sprouts growing.  
These jars are at day 5 and day 2, respectively.

Step 3- Enjoy!

We've started eating our sprouts as early as day 4, but they are best when they've had a chance to get bigger and greener, around day 6 or 7.  We store our sprouts in the jars on the sill just like when they're growing, since they usually get eaten quite quickly.  But if you'd like to store your sprouts for longer, they will need one final rinse, then a thorough drying out (try a salad spinner or laying them out on a paper towel), and will need to be stored in an airtight container in the fridge (you could store them in the jar they were grown in, just replace the screen with the regular lid).  We've never gotten to that point, since we eat them too quickly!  They are amazing on sandwiches or in burritos or fajitas, and we've even eaten them by themselves in a bowl with a little dressing, like a micro-salad!  Wyatt even loves them, and stuffs them into his mouth by the handful!  They're so tasty, it's a wonder it took us this long to do our own sprouts!  Yum!


Friday, December 31, 2010

Homeground flour!

This fall, part of our filling the root cellar involved buying 100 pounds of wheat, and a hand crank grain mill.  We had been baking all our own bread for a couple months, and decided to give home ground flour a try.  Ever wonder why all store bought flour is enriched?  Because wheat berries (the whole wheat kernel), when crushed or cracked or ground, lose about 80% of their naturally occurring nutrients (vitamins, minerals) within about 72 hours.  Store bought flour would otherwise be virtually nutrientless if not enriched with shelf-stable vitamins and minerals.  Freezing cracked wheat or flour can retard this nutrient loss, but in order to be successful you'd have to buy flour directly from the flour mill on the day that it was ground.  The whole wheat berry, however, is so non-perishable you can store it for years!  The choice to go home-ground was a pretty easy one, though finding a good non-electric grain mill proved challenging.  Thankfully, customer reviews are often extremely helpful in finding out more information than the product's packaging will give you, and we decided on the Back to Basics hand crank grain mill.

We are fortunate enough to live within a reasonable distance of a pretty awesome flour mill, Cortez Milling.  You can buy their flours in supermarkets (under the brand Blue Bird Flour), but you can also buy wheat directly from the mill, for crazy cheap.  To start ourselves off on our home grinding adventures, we bought 50lbs of Hard Red Winter Wheat and 50lbs of Hard White Winter Wheat.  As we've learned through research and personal experience, the white wheat makes a much better flour than the red, and the red makes an excellent cereal grain and substitute for rice in any recipe.

It's not difficult to grind flour or crack grain for cereal (trust me, there is nothing like freshly cracked oatmeal!!!), and Wyatt even likes to help!  It doesn't make a truly fine flour, unfortunately.  It doesn't get the bran as fine as the rest of the kernel, and bread made solely with the flour does tend to be a little bit denser, but it is delicious, and oh so nutritious!  We have found that when a finer flour is needed, a quick run through the food processor helps to break up the bran more, and you can sift out the bran (but then you lose a lot of fiber, and it's no longer whole wheat flour, which fairly defeats the purpose).  Eventually we plan on upgrading to the grain mill attachment for our Kitchenaid stand mixer, which reportedly does make a fine flour, but until then, we're pretty happy with our little grain mill!

Wednesday, December 8, 2010

Our root cellar!

This fall, we finally built our root cellar!  Well, not so much a cellar as a shed... We built it over the existing crawlspace access on the side of the house, so we can use the constant temperature of the crawlspace as a heating source in the winter and cooling source in the summer.  Go geothermal!  Since in Colorado you can't add directly onto a mobile (dumbest. law. ever.), we had to build it 'adjacent' to the house, but it's right up against it, which also helps in temperature regulation (in fact, the wall up against the side of the house isn't even insulated).  We do have to keep the crawlspace trap door open, and with the help of a single incandescent bulb, we're able to keep it a very constant temperature of 40 degrees, even when it's dipped down to 0 outside at night!  Without the light bulb on, it gets down to about 33, which is just a wee bit cold for our liking.  But 40 is perfect!  And it makes an awesome wine/beer cellar!!!  

It's not sided yet, but it's functional!


 That's looking under the house- Not too comfortable to get down under there, but it's great for critter-proof buckets of stuff we have multiples of.  Those buckets have wheat grain in them- the real deal!

 Great bucket storage for wheat berries, flour, sugar, beans, etc., and non-perishables that aren't in critterproof containers are in that big rubbermaid tub on the floor.  We've also got a good stash of household items!

 Home-canned goods look so pretty on the shelves!

The downside of having to leave the trapdoor open- Watch that first step, it's a doozy!

And there's the root cellar!  It's not quite as full as we'd like it to be, but it's a start!  Plus it frees up a TON of cabinet space in the house, which is a precious commodity as it is!  I hope it's as much of a success in the summer as it is in the winter- only time will tell!  

Back to the garden...

It's time for a revamp.  Considering I haven't posted in about 6 months (deplorable, I know...), I think it's time to expand my subject matter a bit.  Not to say I haven't been getting my craft on, I have.  But I think recent decisions in our lives have lead to many lifestyle changes that kind of fit into the crafty mold.  And so, without further ado, I give you the new and improved Made in the Mountains...

I've added a new wee quote to my page, one that I think is pretty befitting our life now and hence, this blog.  The inimitable Joni Mitchell said it quite well in her song "Woodstock"- "We are stardust, We are golden, and we've got to get ourselves back to the garden..."  I'm not about to go traipsing through an upstate NY field covered in mud and daisy chains, much fun as that might be, but that line rings pretty dang true to me these days.  The homesteaders had it right, and so did (do) the folks on 'hippydippy' communes (minus the cultishness).  Back in the day, growing your own food, building and making your own homes and tools and furnishings and toys, preserving food, and generally being self-sustaining wasn't just what Earth-conscious nature freaks did, it was what most everyone did.  It's in our racial memory, imprinted in our brains from thousands of years of being hunter-gatherers.  And yet, in just the past 60 years or so, our lives have become so accustomed to once-novel ideas like packaged foods, freezer meals, and drive thru fast food, that for so many, the thought of baking your own bread, or *gasp!* grinding your own flour is crazy!  'It's too time consuming!  Who really grinds their own flour anyways?'  How can it be that in such a relatively short amount of time we have made ourselves so utterly dependent on supermarkets?  On foods shipped in from all over the world?  There are children in our country who cannot identify whole fruits and vegetables, but know tater tots and chicken nuggets like their own two hands (For proof, watch Jamie Oliver's Food Revolution... it's frightening, to say the least).  This is so wrong on so many levels.

Ok, don't get me wrong, I shop at a grocery store, I love packaged foods, I appreciate their convenience, and I don't think poorly of anyone who only buys their food.  I know not everyone can have a garden, and for most people who do garden for food, they can't support their vegetable food needs completely.  We certainly can't!  And in our efforts to fill our new root cellar, we're filling it mostly with food we've bought.  There's nothing wrong with that!  But it is our dream to sell our house and buy a bigger piece of land, build our new home, and grow as much of our own food as we can, both crops and livestock.  In the meantime, we're trying to do as much of that as we can on our little half-acre in the mountains.  And that, my friends, is where this new blog is headed- getting back to basics!