
Showing posts with label handmade. Show all posts
Showing posts with label handmade. Show all posts
Tuesday, May 18, 2010
An AWESOME sewing resource
I have to share this again (first posted on FB) because this site is probably the best free sewing resource I've found, and has already served as great inspiration for me!!! I could spend hours clicking every link to see all the projects, and have already checked out a bunch of really interesting ones! There are projects here that are easy enough for beginners, and a lot have photo tutorials like the one I posted yesterday, so they're really easy to understand even if you don't know the sewing terms. I can't wait to try these hair curlers, I've been curious about using rollers but don't want to buy a set (my hair is so thick it doesn't hold a curl well, so I am hesitant to spend money on rollers in case they don't work), and I want to make this bag to hold them in (only slightly larger than the one she has pictured). And just for good measure, here is the full address of the awesome sewing pattern site, in case the first link is funky for you ;)

Monday, May 17, 2010
30 Minute Project- Clothespin Bag!

30 minute project- Clothespin Bag!
I got the idea for this bag one, by the awesome weather we're finally having (perfect for drying laundry outside!) and two, from checking out ideas on the internet (just do a google image search for "clothespin bag" and you'll see lots of cute stuff!). I make no claim to the design though, since I kind of copied one I saw pictured online. I made it in about half an hour, probably less even, and I'm hoping that this will be the first in a series of quick projects, ones I hopefully can do start to finish during naptime! :D
This project uses a single fat quarter of fabric. What's a fat quarter, you say? If you're not into quilting (or cute fabric hoarding, like me), you might not know that a fat quarter is a 1/4 yard of fabric, but cut in such a way that it's 'fat', not long and narrow like if you asked for a 1/4 yard of fabric cut for you at the craft store. Most places sell fat quarters already cut, since it's a quilting thing. Even my Walmart's puny fabric section has fat quarters, both individually and in bundles of coordinating fabrics. You could go the high-tech route and make this out of a weatherproof fabric, like a coated ripstop like a tent is made out of, but they don't usually come in cute patterns, so I opted for a funky batiq cotton instead ;)
Materials-
Fat quarter of cute fabric
Children's size coat hanger (not wire)
bias tape or ribbon to match
Step 1- Cutting the pattern-
Fold the fat quarter into a square, and trim the extra edge (keeping the selvage edge of the fabric, if there is one)

Fold it into another triangle, with the first folded edge on the bottom (This will make the bottom of the bag), and place the hanger on top as shown below, halfway along the hanger, with enough room at the edge of the hanger for a seam allowance.

Trim the sides and the top edge as shown below, leaving adequate seam allowance.

Next, unfold the fabric, and refold it the long way once. Cut a keyhole shaped hole, large enough to fit your hand in easily, but keeping the bottom fold of the bag in mind (so don't make the hole too far down, or the pins will spill out!)

This is what your fabric should look like once all the cuts are made, and completely unfolded.

Step Two- Bias tape-
sew the bias tape or ribbon to the edges of the keyhole opening. I machine basted the ribbon to the wrong side of the fabric first, then folded it over the edge of the fabric and sewed it to the right side, using a decorative zig zag stitch (which also helps the ribbon to lie flat and hold the opening open when completed)


Also sew a piece of bias tape or ribbon to the top edge of the back of the bag (I just basted it on)

Step Three- Assembly-
Next, bring the RIGHT SIDES TOGETHER, and sew along the edge seams of the bag, starting at the top of the keyhole opening to ensure evenness as you sew towards the folded bottom edge of the bag.

Here's the completed bag, inside out. Trim any ribbon/tape ends and thread, turn right side out, and...

Add the hanger and VOILA! Ready to go!

A nice full load of pins!
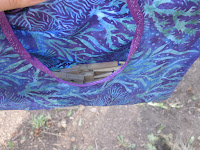
Sure beats struggling to stick the pins back on the line when your arms are full of clean laundry! :D

Sunday, May 16, 2010
...in which I show off more completed projects!
Not to sound braggy, but I'm pretty dang proud of the baby blanket I made my new niece, Lucy! Though it took what, four, five months? for me to finish it, it was at long last received yesterday by its new owner, and now I can show it off to the general public! :D


A funny story about the blanket, it took me three tries to get it right (thank goodness third time's a charm, cause the mistakes were getting old...), the best mistake of which was when instead of "Twinkle twinkle little star", I had inadvertently misspelled it as "Twinke twinkle", and didn't notice the mistake until AFTER it was embroidered... Whoops...

I finally finished my MITM needlepoint, which will find its home on the wall in my shed!


Two of three lap quilts I made, the top one for my brother and his family, the second one for my mother-in-law (the third unpictured quilt was given to my parents for Christmas, these two were *supposed* to be Christmas presents as well, but we all know how that turned out) ;)

Lately I've really been enjoying knitting on looms! It is SO quick and easy, and it's easier to work with funky chunky yarns that would be difficult to knit with regular needles. The green hat is one of two I made for my mother-in-law (who is undergoing chemo), the pink one for our friends' Ian and Gayle's new baby girl, Sydney!

And I am very proud of the VERY FIRST sweater I have ever actually completed!!! (I've started several... and, well...) This I also knit on looms, with crocheted button bands, also for baby Sydney! It is SO soft, and I love this chunky yarn, but unfortunately it does not like to stay knotted at the end of where it's been bound off, so I'm hoping it doesn't unravel any more than it did while I was working on it!
I think that's about it for my most recent projects! My work-in-project list is now happily crossed off, and now I can finally get to some new projects that have been waiting patiently for me to begin! :D
Tuesday, May 4, 2010
Some recent projects
As promised in my previous post, here are some photos of some recently completed projects! (ok, it's being weird and not letting me re-order the photos...)
Here's what my 'winter setup' looks like, my little folding table (counter height!) in the corner in our bedroom. It's tight but it gets the job done!

Here's a hat that I crocheted, I think last fall or summer, and just rediscovered it amongst all my yarn! Wyatt being a non-cooperative but very cute model ;)

Here's a hat I'm working on, on a round knitting loom. Loom knitting is SO much fun, goes quite quicker than needle knitting, and you can use chunky or otherwise difficult yarns to work with! This one is done with a double strand of a very soft plush yarn, it's going to be delicious!

And here is the market bag which I made on the long knitting loom (the top edge and handles are crocheted). It is VERY stretchy and can hold a lot of stuff! I plan on making a bunch more of these soon!

More photos to come as finished projects are delivered to their recipients! :D
Friday, April 30, 2010
OMG I suck at blogging...
Nearly two whole months without a post? Really Julia? Oy! I am sorry! Don't let the lack of blog posts fool you, I have been quite busy with craft projects, or at least as busy as I can be when being a mommy to a two year old! (Ok, I admit, I could be spending a lot LESS time on the computer and a lot more time crafting, it's something I'm trying to work on and hopefully once the weather warms up and I can be in my shed, things will change...) Unfortunately, most of my projects are still Works In Progress... Ah, the dreaded WIP... I have a BEAUTIFUL baby blanket for my new niece Lucy, waiting to be finished (I won't post a photo of it here until I do finish it and send it to my brother and his family!). I have a hat on a loom to be completed for Kayla (my wonderful Mother-In-Law who was recently diagnosed with Breast Cancer). I have a whole list of projects that actually haven't even started yet- Red's bivy sack (we ordered the fabrics for it from Outdoor Wilderness Fabrics, an excellent resource for all things outdoor fabric!), fixing his enormous stack of ripped jeans, crocheting a bag for my grandma, goodness I can't even think of the other projects without getting my list, but you get the picture... and yes, there are more, many, many more.
Some projects I've actually completed recently are- a loom-knit and crocheted market bag (SO cute! I'll post photos another time); a crocheted hat and monogrammed baby blanket for our good friends' Gayle and Ian's baby-to-be, Sydney; a crocheted cell phone pouch for my grandma; monogrammed towels and sheets for my friend Stacey's husband, who is currently in Afghanistan; I repaired my favorite pair of jeans with a little bit of darning stitch over a small hole which, if not darned, would have quickly turned into a very large hole; Also repaired two pairs of Red's jeans (it's a start, albeit a small one, on his enormous stack of holey jeans) and replaced several missing buttons on a shirt. Sadly, not much else comes to mind... I feel like there is more, but if so it escapes me right now!
I also have been dabbling in cake decoration, though not too much. Two times I baked cakes, I got horribly sick the next day, even though the second time I didn't so much as taste the batter... I'm sure it was coincidence and not actually food-related, but it was enough to turn me off the idea for a while. I did bake and decorate Wyatt's birthday cake, which I must say I think came out quite well and was very tasty! (patting self on back) We're getting ready to plant our garden and greenhouse, which I consider to be a crafty sort of thing, so I'll be posting about that more as the summer goes along (first of course it has to show up, but that's another story all together...)
Monday, February 1, 2010
Post Holiday catch up!
Yet again it has been too long since my last post! Thankfully, a LOT has been going on in my crafting world since then, mostly holiday related. I mastered the soap crayons, and made 8 complete sets of colors- Red, blue, green, yellow, and purple. They are a ton of fun in the tub, Wyatt loves them! I also made many batches of bar soaps of various flavors- Vanilla, lavender, vanilla mint (my fave), chocolate mint, eucalyptus mint (Red's fave), and I think that was it...? They made great Christmas gifts, and I'm proud of them! They were really easy to make, and I think I'd like to experiment with making soap from scratch this summer, when I can do it outside. Making soap from fat and lye can be a bit dangerous, and the fumes as it's cooking are caustic I believe. The soaps I made were from store-bought glycerin soap, so no danger was involved.
I also have made (and am still making) a few smallish lap quilts as gifts. Only one of the three has been given, the second is awaiting shipment, and the third is partially completed, so I'll wait until they're all done and given to their recipients before I post photos. Same goes for the baby blanket I am making for my new niece Lucy! Funny story about the blanket- Wyatt spent Saturday night with Red's mom so I could have the afternoon to work on these sewing projects (it can be difficult with him around). I worked on the baby blanket all afternoon, and had a number of problems with it. I was embroidering designs with my amazing machine, but the thread I was using was quite thick (I bought the wrong kind of thread unknowingly), and it was getting bound up in the bobbin case (no good). I devised a way to 'fix' the destroyed design in the center by making an applique patch to go over it, and continued embroidering. Then, as I was embroidering the words to "Twinkle twinkle little star" along the edges, I realized too late that I had misspelled the first "Twinkle"... I had spelled it "Twinke"... AHHH!!! The font I used was a very loopy script and I guess I just didn't notice it... Whoops... That was the last straw, and so I decided to cut my losses and start completely over with new fabric. Oh well... it's always a learning experience! Twinke... :P
Wednesday, December 2, 2009
Soapmaking attempt #2
Well, crayon attempt #1 was not as successful as I'd have hoped. Though it was good soap, it didn't draw very visibly on the tub. The wonderful thing about soap though, is you can remelt it and try again! For attempt #2 I added more of the soap dye I had, but it just wasn't concentrated enough, so I tried some Wilton icing coloring (food coloring but highly concentrated) and boom it did the trick!!! These crayons are RED! We'll give a crayon the official bathtub test this evening, but I was already able to draw on the sink with what little soap had congealed on the spoon I was using, and it should do quite nicely! Another bonus with using the food coloring is I have 8 colors of coloring, so I can make a wider variety of crayons without having to mix colors together. Hooray!
Tuesday, December 1, 2009
Soapmaking attempt #1!
As it is now officially Christmas season, I am getting started on making gifts! I decided some time ago I wanted to try my hand at soapmaking, and bought supplies at Hobby Lobby a few weeks ago, but am just now trying it out. I have been wanting to find soap crayons for Wyatt for bathtime, he has some bath crayons but they're not soap, just very soft wax, and he likes to eat them... great... So I was looking online for actual soap crayons, but one of the first hits to come up was a recipe to make your own! Woohoo!!! And luck have it, I had all the ingredients I needed for it! So right now I have six red crayons hardening, I wanted to start off with just a small batch, so we'll see how they turn out and how well they draw. The soap base I bought is clear glycerin, but I think opaque white soap would have worked better for the crayons. Other than the glycerin, I just added some vitamin E oil for moisturizing, and the coloring (you can use food coloring, but I happened to have found soap dyes at Hobby Lobby so I got those, either way they're non toxic). For molds, I am using ice trays that I bought for freezing breastmilk, but they are horribly
designed for it (even though designed for it), they leak and the cover is not airtight, which doesn't bode well for breastmilk... Anyways, they do make perfect crayon molds, they're half circles, long and a little under an inch wide, good for little hands! And if you read this, and your kiddo gets some as a gift, be sure to act surprised!!! ;D

Tuesday, November 24, 2009
New machine!!!
O.M.G. That is about what sums up how amazing my new sewing machine is!!! I am now the very proud new owner of a brand new Bernina Aurora 430, and will soon be the owner of the embroidery module to go with it (well technically I already am the owner since it has been paid for, but it had to be ordered and should be here within 2 weeks or thereabouts). The machine itself is absolutely incredible. So much so in fact that in it's own manual, it's not called a sewing machine but a sewing computer. I haven't even plugged it in yet because it is such an advanced machine, I've read the manual twice and still don't feel ready to give it a go yet. Quite fortunately, the awesome Bernina store I bought it from offers free mastery classes specific to the machine, and I know for sure I will need to take at least one class! Likely even two, one for the machine itself, the other for the embroidery part of things! I am so excited at the possibilities for amazing projects with this machine, and can't wait for the embroidery module to come in! Hello awesome Christmas gifts! I keep having moments of 'holy cow!', thinking of all the amazing things I can do with this machine! Hopefully the learning curve won't be too difficult, though just from reading the manual I am realizing how very little I actually know about machine sewing... I'm realizing all these years I've either been fudging it or underusing the capabilities of even my basic Singer, what with not knowing really what stiches or presser feet or needles are best for which types of fabric or thread or applications... And really I've never had anything to tell me otherwise! The stuff I've learned just reading the manual has been amazing! The manual for my Singer, though a relatively new machine, probably had most of the instructions and diagrams copied from manuals from the 50's... And definitely didn't explain much beyond how to physically use the machine... Anyways, I have definitely got my work cut out for me in figuring out my new "sewing computer", but I am very much up for the task!
As for my shed, I unfortunately haven't been able to work out there yet. It's still unheated, and it has been quite chilly these days. The challenge with heating it is this- Though all the outlets in the shed work, the main hookup for the shed is only powered right now by a single outdoor extension cord, capable of carrying 14-15 amps. Most electric space heaters pull at least 12 amps, so if I were to use an electric heater, I wouldn't be able to have anything else on (lights or machines) while the heater is on. While this could work temporarily, it's not ideal... I'd have to go out well enough ahead of time to get the shed warmed up, and if it got chilly while I was still working out there, I'd have to stop using anything electric to warm it back up. Doable, but clearly a hassle. My other option is propane, but it's a pricier option (my MIL has an electric space heater that I'd be able to have for free). Though a friend has a 100 gallon portable tank that we could have, I'd have to buy some sort of heater for it, and of course the propane itself. Not sure when that could happen. The third and final option is to get real power to the shed, and though it's doable, it's not going to be easy... I'd have to dig a ditch from the house to the shed, so that we could bury some direct bury line from the house to the shed. I'd have to go about 25 feet to get there, including across the driveway (gravel, but a PITA to dig through). I'd still have to be careful with my amperage usage, but it wouldn't be as bad as just the extension cord. So all in all, nothing is the 'easy' solution, but there are solutions out there... Just which one happens by first significant snowfall is up in the air... ;)
Subscribe to:
Posts (Atom)