
Wednesday, December 2, 2009
Soapmaking attempt #2
Well, crayon attempt #1 was not as successful as I'd have hoped. Though it was good soap, it didn't draw very visibly on the tub. The wonderful thing about soap though, is you can remelt it and try again! For attempt #2 I added more of the soap dye I had, but it just wasn't concentrated enough, so I tried some Wilton icing coloring (food coloring but highly concentrated) and boom it did the trick!!! These crayons are RED! We'll give a crayon the official bathtub test this evening, but I was already able to draw on the sink with what little soap had congealed on the spoon I was using, and it should do quite nicely! Another bonus with using the food coloring is I have 8 colors of coloring, so I can make a wider variety of crayons without having to mix colors together. Hooray!
Tuesday, December 1, 2009
Soapmaking attempt #1!
As it is now officially Christmas season, I am getting started on making gifts! I decided some time ago I wanted to try my hand at soapmaking, and bought supplies at Hobby Lobby a few weeks ago, but am just now trying it out. I have been wanting to find soap crayons for Wyatt for bathtime, he has some bath crayons but they're not soap, just very soft wax, and he likes to eat them... great... So I was looking online for actual soap crayons, but one of the first hits to come up was a recipe to make your own! Woohoo!!! And luck have it, I had all the ingredients I needed for it! So right now I have six red crayons hardening, I wanted to start off with just a small batch, so we'll see how they turn out and how well they draw. The soap base I bought is clear glycerin, but I think opaque white soap would have worked better for the crayons. Other than the glycerin, I just added some vitamin E oil for moisturizing, and the coloring (you can use food coloring, but I happened to have found soap dyes at Hobby Lobby so I got those, either way they're non toxic). For molds, I am using ice trays that I bought for freezing breastmilk, but they are horribly
designed for it (even though designed for it), they leak and the cover is not airtight, which doesn't bode well for breastmilk... Anyways, they do make perfect crayon molds, they're half circles, long and a little under an inch wide, good for little hands! And if you read this, and your kiddo gets some as a gift, be sure to act surprised!!! ;D

Tuesday, November 24, 2009
New machine!!!
O.M.G. That is about what sums up how amazing my new sewing machine is!!! I am now the very proud new owner of a brand new Bernina Aurora 430, and will soon be the owner of the embroidery module to go with it (well technically I already am the owner since it has been paid for, but it had to be ordered and should be here within 2 weeks or thereabouts). The machine itself is absolutely incredible. So much so in fact that in it's own manual, it's not called a sewing machine but a sewing computer. I haven't even plugged it in yet because it is such an advanced machine, I've read the manual twice and still don't feel ready to give it a go yet. Quite fortunately, the awesome Bernina store I bought it from offers free mastery classes specific to the machine, and I know for sure I will need to take at least one class! Likely even two, one for the machine itself, the other for the embroidery part of things! I am so excited at the possibilities for amazing projects with this machine, and can't wait for the embroidery module to come in! Hello awesome Christmas gifts! I keep having moments of 'holy cow!', thinking of all the amazing things I can do with this machine! Hopefully the learning curve won't be too difficult, though just from reading the manual I am realizing how very little I actually know about machine sewing... I'm realizing all these years I've either been fudging it or underusing the capabilities of even my basic Singer, what with not knowing really what stiches or presser feet or needles are best for which types of fabric or thread or applications... And really I've never had anything to tell me otherwise! The stuff I've learned just reading the manual has been amazing! The manual for my Singer, though a relatively new machine, probably had most of the instructions and diagrams copied from manuals from the 50's... And definitely didn't explain much beyond how to physically use the machine... Anyways, I have definitely got my work cut out for me in figuring out my new "sewing computer", but I am very much up for the task!
As for my shed, I unfortunately haven't been able to work out there yet. It's still unheated, and it has been quite chilly these days. The challenge with heating it is this- Though all the outlets in the shed work, the main hookup for the shed is only powered right now by a single outdoor extension cord, capable of carrying 14-15 amps. Most electric space heaters pull at least 12 amps, so if I were to use an electric heater, I wouldn't be able to have anything else on (lights or machines) while the heater is on. While this could work temporarily, it's not ideal... I'd have to go out well enough ahead of time to get the shed warmed up, and if it got chilly while I was still working out there, I'd have to stop using anything electric to warm it back up. Doable, but clearly a hassle. My other option is propane, but it's a pricier option (my MIL has an electric space heater that I'd be able to have for free). Though a friend has a 100 gallon portable tank that we could have, I'd have to buy some sort of heater for it, and of course the propane itself. Not sure when that could happen. The third and final option is to get real power to the shed, and though it's doable, it's not going to be easy... I'd have to dig a ditch from the house to the shed, so that we could bury some direct bury line from the house to the shed. I'd have to go about 25 feet to get there, including across the driveway (gravel, but a PITA to dig through). I'd still have to be careful with my amperage usage, but it wouldn't be as bad as just the extension cord. So all in all, nothing is the 'easy' solution, but there are solutions out there... Just which one happens by first significant snowfall is up in the air... ;)
Monday, November 9, 2009
WOOHOO!!!
I am now officially moved in to my craft shed!!! That was FAST! We were able to put the wall cabinets in, and now all my craft stuff that had otherwise been relegated to hiding in Wyatt's closet or under our bed is now fully accessible, organ
ized, and I have a place to do stuff with it! YAY!!! Not to mention all the space it freed up in the house! Here are pictures! (Now all I need is a chair!) ;D

Lots of storage, most of which is still empty even though I'm all unpacked! (which means lots of space for NEW craft supplies! Yay Christmas!)

The sewing table, with hidden storage behind the door with the trays on it
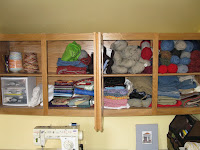
All my fabrics and yarn! An impressive collection of Brown Sheep yarns... Wow!

More surface space, and my pretty colored pencils on display ;)

A big blank wall for a pinning board (for pinning quilt blocks together, etc), and space for my cutting mats, straight edges, and an ironing board
 My dress dummy Ethel finally has a cozy place to live!
craptastic cabinets galore!
Well, it seems there is a slight change of plans with my shed. We started taking apart the desk cabinets, and upon removing the countertop, discovered that the cabinets are the CRAPTASTICEST CABINETS EVER MADE. Seriously, they were cutting some SERIOUS corners when they made these "cabinets"... and I use that term VERY lightly. So essentially, they are crap and not going to work in my shed, and to make them work would be more pain than they are worth. So instead, we're still going to rip them out of the house and build closets in their place, but in my shed for now we will put my sewing cabinet and our folding table out there, and we've already got two tall cabinets out there now (they're narrow but nice, one is all drawers and the other is drawers with a cabinet on the top half) so I'll be able to move into that storage, and the rest will live in storage boxes we already have. Come spring, I'll build a workbench in there, and by then I'll have a sense of where everything works best in there, and what additional storage and surface space I'll need. Frankly I thought that was going to be the plan from the beginning, but Red had said he'd help me get the cabinets in there sooner rather than later, so we went with that plan. Until of course we discovered just how craptastic the cabinets actually are... Seriously, they're embarrassing... The good news is that the wall cabinets above the desk are actual real cabinets, so we'll still be able to put those out there, but we're going to wait on that. In the meantime, when we do rip out the cabinets, we'll have to retexture the wall behind them cause the drawer hardware ends are GLUED to the wall (WTF?) rather than the non-existant back of the cabinet... and there are no sides on them, and the shelves of the hallway cabinet are attached to the walls not the cabinet, so I'm sure in demo we'll do some more damage over there... Really? Geez... ;)
But all in all it's even better, cause I'll be moved in to my shed TODAY! It still lacks flooring though, but it's no big deal, we Kilz'ed the floor so it's not grody anymore, and we've got some leftover carpet from Wyatt's room that I can put out there for the winter to keep my tootsies warm! :D
Thursday, November 5, 2009
Bad Blogger!
Whoops! Been a while! Last I wrote the shed was sheeted and partially puttied/caulked. Now it is completely caulked, puttied, primed, and painted, and is ready for the cabinets! The paint is a cheery warm sunny yellow, not too bright, almost creamy buttery, and it looks great! I don't have pictures at the moment but I will soon I'm sure. I just finished working on clearing out our big desk cabinet dealie (which was WAY full of all sorts of stuff) so that the next day Red doesn't have work, we will remove the cabinets and install them in my shed! We have to do some blocking up of a few of them to bring them all to counter height (36"), but it will give me space beneath them for some wooden drawers like the ones Red just built for his workbench in his shop. They'll be nice! We'll have a bit of a construction zone in the house after we remove the cabinets, cause it will likely be a little while before we have the extra cash and time to build the pantry and linen closets that will go in their places. We'll have a nice little stash of Pampers boxes added to our decor! But the end result of both the shed and the closets in the house will make a HUGE impact on our home and my general sanity!!! I can't wait!!!
I also can't wait for Christmas (though I still haven't started on making any presents so I kind of can wait...) because this year I'm getting a new sewing machine! Possibly even two!!! My old Singer is still quite functional, but it only has utilitarian stitches and doesn't have the stamina for heavy fabrics. I know I need one that can handle heavy duty fabrics (denim, cotton duck (think Carharrts), even leather), and I'd really like to have a good selection of decorative stitches as well as all the utilitarian stitches. But it's so hard to chose a machine! I have fallen in deep like with a number of combination embroidery/sewing machines that are computerized and can do SO much cool beautiful stuff... But they're expensive... And I'm not sure of the quality or reliability of the less expensive models... It's hard when you can't see them in person... I'd also like a serger, and those are surprisingly cheap for what they do (look at the seams on your jeans- those are serged seams). I'll still keep my Singer, but a new machine or two would breathe life back in my craftiness! :D
Anyways, I'm hoping to get the cabinets in the shed in the next two weeks or so (hopefully before Thanksgiving!) so I'll be sure to update as we go! :D
Tuesday, September 15, 2009
madeinthemountains.net is mine!
Well, I am the proud new owner of madeinthemountains.net... Sadly, not .com, as someone owns that already, even though there is nothing at madeinthemountains.com... Apparently if you own a domain name, you are in a publicly searchable database (unless you pay extra for privacy protection), so I was actually able to find the owner's email address and send her a hopefully not too spamylooking email asking if she would be willing to transfer the domain name to me, or if she plans on renewing it when it expires next June... I'm hoping I'll get it someday... but for now, I own www.madeinthemountains.net, though it's not up and running yet so don't go sneaking around trying to take a preemptive peek! I only purchased the domain, I haven't paid for hosting yet, so on the mockup site there are still annoying ads, but soon... Once the store is ready to go then I'll bite the bullet and get it up and running for reals. Until then, I'm sitting on my hands!
Wednesday, September 9, 2009
The shed, and the CPSIA... Ugh...
The shed is sheeted (actually has been for a couple weeks!) and ALMOST ready for paint... I've got most of the seams between sheets filled with either wood putty (for the smaller tighter ones) or caulk (for the gapeyer ones) and am waiting on that to dry. Still need one more tube of caulk to fill in the bigger seams, then smoothing them with more wood putty, then let it all dry, then sand the putty if needed, THEN I can paint (well, primer first, then paint.). Still haven't dealt with the door yet, but I suppose I can't really paint until that is all finished (as there's a peice of sheeting that still has to go up, but can't until the new door is in place). But I can at least primer everything else! LOL... It seems like alot to get there but it really isn't, except for the door thing. I could just use the existing door and forget about the other door with the window, but we'll see... another window would be nice!
I'm getting really excited to make lip balms, soaps, and maybe even lotions! I've gotten several awesome books with recipes for these things, and Kayla and Lynda have offered me a HUGE slab of beeswax to use! I'm hoping to sell them on my website, and also at the new salon that a friend Robin just opened up here at the lake! She's offered to sell local crafts there, and I talked with her about my ideas and we both think they'd be a great fit. Right now I'm trying to research FDA and Consumer Product Safety regulations on items like that. They're largely regulated by the FDA rather than the CPSIA, and at least from what literature I've read thusfar, the regulations seem incredibly lax- so long as your label states ingredients and makes no claims to do something it won't, you're pretty much in the clear (of course it does regulate other things like use of actual drugs in products but I don't have to worry about that). It seems like I'm missing some key points here, like I feel like there should be sanitation/cleanliness standards in the making of the products, but other than a broad statement saying the product shouldn't be spoiled or show other signs of spoilage from the manufacturing process, I really can't find much else to that effect... Though I am glad that the FDA's website explains much of this stuff in laymans terms.
The CPSIA (Consumer Product Safety Improvement Act) is so redunk... While the basis for it is great, it has the potential to put alot of small businesses and home crafters out of business. It states that any manufacturer (and it defines a manufacturer as any person or business who makes products for sale or even donation, so under the CPSIA I am a "manufacturer") who manufactures products intended for use by children under the age of 12 to have their products tested for lead, pthalates, and "other harmful chemicals" by independent lab testing facilities, at the expense of the manufacturer. And not just one of each type of product you make, but one of each type, from each BATCH of that product you make. There are exceptions, and thank goodness sofar all my baby stuff falls under the exception category (anything made of yarns or fabrics, so long as they do not include any metalic threads, or things like buttons, snaps, clasps, zippers, etc), but man... The law apparently is in effect now, but won't be enforced until February 2010, but manufacturers are expected to be or to become compliant now... While I am ALL for safety and regulation of childrens products, this goes a wee bit overboard. It is also unclear whether you are exempt if your products are made from ingredients or parts bought from compliant manufacturers... If that were the case, it would be great, but unfortunately I'm not sure it is the case... The Batch thing is pretty redunk too... and I'm not sure how they classify a 'batch', if it's the number of the same product you can make in one sitting, or the number made from the same batch of ingredients (so say you made shirts with snaps on them from one bolt of fabric and one box of snaps- is it how many shirts you can make in one sitting, or how many you can make from that bolt and box?) For a home crafter like me, this law would be devistating. Testing of products could cost hundreds or thousands of dollars, per test. This law is clearly designed for big time manufacturers where quality and safety can get lost amidst the mass, but unfortunately the wording of the law is very broad, and in being broad, encompasses 'manufacturers' like me. Don't get me wrong, I would NEVER make or sell a product that was harmful to it's target user. And regardless of this law, I would take whatever steps to ensure that all ingredients or parts were sourced from compliant manufacturers and were of the highest quality and safety. But really? Must I send one of everything to a lab to be tested? Even if I made a hat and put a cute little butterfly button on it or something like that... And I could even state that the hat is not intended for an infant (so they wouldn't be sucking on the button)... An 11 year old knows better than to suck on the button on her hat... I don't know... It just seems redunk to me... It will be very interesting (and sad) to see what happens to sites like Etsy.com once this law is actually in effect and being enforced. Will the CPSC bother with small time crafters like me? I'd hope they'd focus their enforcing efforts on big manufacturers, which are typically the ones needing the most enforcing... but who knows... we could all be vulnerable...
*Edit* -Here is a great article about the CPSIA, with several good links within the article as well. It also has more of the exempt materials listed on page 2 of the article. http://womeninbusiness.about.com/od/lawsaffectingwib/a/CPSIA-aboutact.htm
Tuesday, August 25, 2009
One (BIG) step closer!
The shed is now insulated!!! WOOT! And the VERY best part of it is I didn't have to do it! (And neither did Red!) Just as I was getting geared up to do it myself, he said he called a kid who has worked for him before and hired him to do it for me! WOOHOO!!! He is also the one who insulated Red's shop for him last fall (or was it this spring? Whenever it was it was cold... Which is pretty much any time of year except July here... LOL and :( ). I've never worked with fiberglass insulation, but I've had more than my fair share of working with fiberglass (namely sanding it, nothankyouverymuch), and it is very high on my list of things I hate... Red's too... Or at least my list of things I do my very best not to come in contact with... ;)


The next step from here will be sheeting it, with which I will definately need Red's help. I've never been very confident in my ability to make long cuts with a circular saw. I'd be ok if I broke out the tablesaw, but I'd rather have his help anyways, after all he is the carpenter! Not sure when we'll get to that, the weather has been pretty rainy the past two days and so he's been home from work (they're painting a house, can't paint in the rain!), but we also can't be out cutting plywood in the rain either... So we shall see! Either way, I am SUPER excited!!!!! :D
Monday, August 24, 2009
Doin' the Electric Slide!
The shed has power!!!!! Just finished wiring it, got all the plugs wired, got the main plug wired, and it all works!!! The power coming to it is just a regular outdoor extension cord coming through a window in the house to a regular outlet, so it is temporary power, but soon I'll buy some direct bury wire (the Romex we have isn't heavy duty enough) so we can run a 20amp line direct from our main breaker box in the house, bury it along the way to the shed (via the greenhouse so we have permanent power there too) and install a breaker box on the shed! But in the meantime, all the outlets work (but won't be able to pull too much power, not enough to run a space heater, for example, which is how I will be heating it in the winter), the lights work, yay! So next on the docket is insulation, it's ready to be insulated, I just don't quite know how yet... ;) It's not hard, I just don't know the tricks. Then after that, sheeting it, then doing something with the floor, and voila! She'll be ready for paint, then furnishings!!! :D I am SO excited!!!
Speaking of furnishings, Red and I talked about my plans for the desk cabinets that we will take out of the house to make room for a pantry closet, and in the process of that talk, also decided to remove the two little hanging cabinets in our laundry closet, AND the little annoying counter cubboard thing and cabinets in the teeny little 'hall' that currently serves as a not so effective linen closet (our plan there is to actually build a real linen closet, it's probably the most wasted ineffective space in the whole house!) so I will get a TON more built in furnishings in my shed than I had anticipated!!! WOOT!!! We won't remove all those things until later in the fall, I think we plan on doing at least the pantry closet sometime in the fall, but perhaps we'll make it a big project weekend or two and do that and the linen closet and some shelves in the laundry closet, all in one fell swoop! Until then, I have my sewing cabinet/table, and a folding 4' table that I'll use in the shed, they'll serve quite nicely until we take out the various cabinets in the house! SO EXCITED!!!!!!! :D
Speaking of furnishings, Red and I talked about my plans for the desk cabinets that we will take out of the house to make room for a pantry closet, and in the process of that talk, also decided to remove the two little hanging cabinets in our laundry closet, AND the little annoying counter cubboard thing and cabinets in the teeny little 'hall' that currently serves as a not so effective linen closet (our plan there is to actually build a real linen closet, it's probably the most wasted ineffective space in the whole house!) so I will get a TON more built in furnishings in my shed than I had anticipated!!! WOOT!!! We won't remove all those things until later in the fall, I think we plan on doing at least the pantry closet sometime in the fall, but perhaps we'll make it a big project weekend or two and do that and the linen closet and some shelves in the laundry closet, all in one fell swoop! Until then, I have my sewing cabinet/table, and a folding 4' table that I'll use in the shed, they'll serve quite nicely until we take out the various cabinets in the house! SO EXCITED!!!!!!! :D
Tuesday, August 18, 2009
Logoified!

Woohoo! I have finally settled on a logo for Made In The Mountains! It's above here, and is on my website! (Which still isn't public yet, hold your horses!) That actually is the real Vallecito mountain skyline, but I wanted to logo to be simple enough to be embroiderable, and to look cute on small printed labels. It might evolve in the future, but for now I think it'll do nicely!
As for the website, my inventory is growing but not quite as rapidly as I would hope. Other projects (the shed) and real life (real life...) tend to get in the way of my kiddo free crafting time (Wyatt doesn't let me work on projects while he's up, unless he is thoroughly contained and happy in his highchair, and that certainly doesn't last long... Plus that's usually my chance to sneak in a bite or two anyways...). I'm working on it though, as much as I can, and am planning on taking the plunge and actually purchasing and registering my domain name quite soon, and shortly after that hopefully I'll have enough stuff ready to open up the webstore! :-D
The shed hasn't made any progress since my last post, and probably won't until at least after this weekend. We have guests this weekend (WOOHOO!) and will be busy splitting firewood all day Saturday with them (not so woohoo, but we all need it!), though this is the last weekend for a while anyways that we definately have other plans. Hopefully I'll be able to convince Red to help me finish up the shed sooner rather than later! The prospect of all the storage space its completion will free up in the house should be incentive enough!
Saturday, August 15, 2009
If I had a hammer...
The craft shed is on it's way to being, well, a craft shed, but it's taking a while (as could only be expected!). The window is in, more lumber was added for nailers (to attach the sheeting to), and the wiring is almost done... Drilling holes through lots and lots of studs with a really long paddle bit is a PITA! Especially through the studs around the window, since we added an extra trim stud on either side to help support the weight of the roof more. But the good news is, the roof won't collapse. ;) What's next is to finish the wiring (the romex is mostly run, except through a few studs I couldn't do myself, then I just need to install the plug boxes), then insulate it (not looking forward to that... Boatbuilding school left me incredibly sensitive to fiberglass), and then sheet it (I'm using CDX plywood, a lower grade plywood that I think is 3/8" thick, I wanted 1/4" ply with one nicer side, but they only had three sheets, and I needed 14...). After sheeting, I'll do a spackle number on the seams and any holes in the plywood where knots were in the wood, then paint the walls (yellow! YAY!), and voila, she'll be ready for furnishings! (still not sure what the plan will be for the floor, it's uneven since the building isn't totally leveled, so I can't do anything rigid. We have some leftover carpet from when we carpeted Wyatt's room, but not enough to do the whole floor, plus I'd rather it be sweepable. For now I probably won't do much of anything to it.) As far as that goes, I have a sewing table/chest which opens out to hold up a drop leaf to make it longer, (closed it looks like a nice bureau) so that will go in there. Eventually, we will be removing the desk and cabinets that are in our mudroom/office/laundryroom, and building a pantry/coat closet in their place, so that desk and cabinets will go into the shed. Until then, I have a 4' plastic folding table that will do quite nicely. Since it may not be entirely critterproof, I'll keep all my fabric and other vulnerable materials in rubbermaid containers, so they'll be stacked up in a corner (I thought of building shelves, but it'd be that much more materials, and the boxes stack nicely anyways). I'm so excited for it, I'm hoping we'll get a chance to work on it more soon, but at this point I need help (never insulated before so not sure exactly what to do), and our weekends have been and will be pretty busy for a bit. We shall see! It's fun though, and exciting, and I can't wait to have dedicated space to spread out all my stuff and get down to business!!! :-D
Saturday, August 1, 2009
Working on it!
Well, my website is kindof at a standstill as I make more inventory for the store. My hands, however, are certainly busy! I am currently making a cute crocheted boys hat out of fun variegated brown yarn, it'll be cute! I also got a set of Knifty Knitters knitting looms, and I have to say they are AWESOME! My reason for trying them out is because I have a bunch of really cool yarn that my mother in law got me, but it is nearly impossible to knit or crochet with because it has holes in it (hard to describe...). Fortunately, it is perfect on the loom! So my first loom project is a skinny scarf with this purple fuzzy yarn, it is turning out super cute! I'm glad I have two skeins of this color yarn, cause I'm definately going to make one for myself!

I have been unsuccessful at finding a flower press to buy, and though they are very easy to make I haven't had the time or the materials to make one yet. And still no further progress on my shed, but it will happen soon I hope! Our cherry tree is doing awesome, and the cherries are starting to ripen! The smaller trees we left uncovered (the big one has bird netting over it) have already ripened, and are being ravaged by the robins and chipmunks. They're much smaller and have a much smaller yeild than the big tree so I'm not too upset about it, plus since we displaced the robin's nest and made them lose their egg, I feel like we owe them this at least... We'll still get plenty off the big tree! I imagine we'll be able to pick in about a week! Yay! Ok, enough writing, back to the loom!
Wednesday, July 22, 2009
Making a name...
I'm now deep in the throws of building a website and online store to sell my crafty goods! It is VERY much in the preliminary stages, so I won't release the web address yet, but it is so exciting! So far I've set it up for free, though I do plan on paying for the hosting service soon to get my own unique domain name and to remove ads from the website. Also, with the free service you are limited to 5 items in the online store, and that just simply won't do! (Even though right now I only have 4 items... LOL!) Once I start paying for it, I'll be able to have 30 items, so clearly I've got my work cut out for me to fill those spots! So far I'm focusing on these super cute baby and toddler hats, they are fast to make and the materials are inexpensive. I do also plan on making some pressed flower note cards with the paper I made left over from the books I made two Christmases ago, and hopefully I'll come up with other fun gifty items adults will appreciate (not to say adults don't appreciate cute baby hats, but usually the adults who do appreciate them are the moms of the babies they want the hats for...) ;) (Now how's that for a run-on sentance ending with a preposition?) So far the website is designed with a pre-designed template, though I have replaced the generic photo logo with my own, if not temporary, logo. I'd like to eventually learn html and css so that I could design my own site from scratch, but for now I am actually really liking the predesigned site, and with a little tweaking it has become my own!


And as a teaser preview, here are a couple of the items I have already added to the inventory... Drool away!
Monday, July 20, 2009
I'm working on it, I swear!
As I have posted before, I usually slow down in the summer craftwise... But things are starting to pick up again! My shed is very nearly empty, there are a handful of things left to be dealt with, then I need to cleancleanclean it, decritterify it (there's an unoccupied birdsnest and who knows what else in there), bug bomb it, and then it'll be ready for me to insulate and sheet and install a window! Woohoo! It probably won't be functional until fall, but I'll be sure to take lots of pictures along the way to track the progress! I'm so excited for it! Woohoo!
I've also been thinking hard about setting up a Made in the Mountains online store so that I can sell my crafts. We could certainly use any extra income, and it would be fun! I'm in the research phase of what hosting service and ecommerce service to use, and I need to build up an inventory before I put anything online, but I'm excited about it! I think my biggest item will be my crocheted hats, mostly for babies/toddlers/kids, they are fast and easy to make and the materials are inexpensive. Yay! Keep an eye out for more on the website! :D
I just made this hat for my best highschool friend's new baby girl, and I'm about to make another one for her 2 year old daughter as well (Kate, if you see this, act surprised when they arrive!). This is my first floppy brimmed hat, I totally winged it (no pattern) and I think it came out great! I'm going to add a grosgrain ribbon around the brim so it can be tightened if it's too loose or used as an under chin tie, but here it is thusfar! So cute! (I'm going to use the foam ball it's on later for photographing hats for the website, I only just got it today so I haven't had the chance to put it on the dowel and make it look nice!) 
Ok, I just added the ribbon and had to post a picture of it finished, cause it is SO DANG CUTE! 
Tuesday, June 2, 2009
Summer is here!
Yet again, it's been a while since I've updated here! Perhaps I hit a crafting slowdown since the weather has been so nice? We've been so busy with the garden, I think I have a good excuse! Though late Spring has brought with it several new ideas for fun projects! Our ornamental cherry trees in the front are blooming like it's nobodies business, and their fragrance is AMAZING! (Actually we're not sure what kind of trees they are, they are some sort of ornamental (inedible) cherry, or perhaps some kind of Japanese plum. The birds don't eat the fruit, so I'm assuming they are poisonous.) I've been wanting to bottle their scent for some time now, and it seems like I just might be able to! I've done some research into perfume making, and it seems easy enough, if I have enough time left in their blooming season! To make perfume or essential oil, you need to have a continuous supply of fresh petals for at least a week, if not two, and I might have missed that window of opportunity this year (if so, next year I'll be prepared!)(and maybe I'll still try it this year with our oriental lilies!). Despite that, I plan on picking up some supplies today to try my hand at it! I'll be using techniques described in Back To Basics: A Complete Guide to Traditional Skills, which is really the seminal book of homesteading self-sufficiency in my opinion. It is full not only of great crafts and recipes and DIY projects, but also has all sorts of info on all matters homesteading- building, farming, raising livestock, really you name it, it probably has it. It's new Third edition is great, I really do recommend it!
Anyways, back to the perfume making- I'm not sure whether I'll try making perfume, or essential oil. To make perfume, you need a fair amount of lard (or crisco), melted onto 10 or so shallow plates. Then you score a crisscross pattern in the solidified lard, and put the petals inbetween two sandwiched plates, and seal them with tape. Every day or two, open up the plates, replace the wilted petals with fresh, and repete about 8 times. Then, discard the petals, put the lard in glass jars, and fill with ethyl alcohol, seal and store in a cool dark place for 6-8 months (!), shaking each jar once every day (!!!)... After 6-8 months, you strain out the fat and add a fixative oil (such as musk or ambergris, or sandalwood oil). Fairly involved process, no? Essential oil is much faster and less involved to make. You put petals in a jar filled with an odorless oil, replacing the petals with fresh ones every day or two, repeting about 8 times. Still as involved as the beginning of making perfume, but thankfully you stop there! I'm not sure which one I'll try (or if I'll try both). I'm also not sure what oil to use for essential oil, what oil there is that is odorless and safe for the skin... We shall see!
I suppose I haven't been entirely projectless lately. I did sew Wyatt's curtains for his room (finally! I've had the valance since before he was born!) not too long ago, though I think that's about it! (he's still snoozing now, or I'd go take a picture! I'll post one soon!) I think fall and winter are naturally more crafty times of year for me, with the weather keeping you indoors and the prospect of the holiday season approaching! Though late summer is typically the time I'm most busy with food-related crafts, namingly canning and preserving! Our sour cherry trees are just beginning to lose their petals, and it's almost time to cover them with bird netting! They're all looking very healthy, so if we manage to keep them well enough protected from being pecked clean, we should have a very delishous harvest in about a month and a half! Also, our recent bout of very rainy weather has forced Red to work on his shop rather than in the garden, which is good news for me, cause once his shop is done he can move his tools out of my soon-to-be craft shed! Yay! He is very nearly done, and I think the only big thing left to do is to have a trench dug to bring power to it from the pedistal, and then have LPEA (our electric supplier) come out and install an RV pedistal! (and we have a friend who has agreed to bring a backhoe over to do the digging!) Hooray! So hopefully soon I'll be able to begin work on making the shed my craft shed! Can't wait! :D
Friday, April 3, 2009
Quick seed starting pots!
Here is a great little project to make homemade (free!) pots for starting seeds in! (I can't take credit for this idea, it was originally in an issue of Mother Earth News, I am afraid I can't remember what issue). Save your empty paper towel and toilet paper rolls, they are definately good for something other than making silly kalidescopes!


Press the empty roll flat, and cut in half (in fourths for a paper towel roll). On the bottom edge, cut four 5/8" slits equally spaced around the tube (if pressed flat, cut through two layers right in the middle, then fold it so those slits are on the folded edges, and cut through again in the middle)
Fold the four flaps shut like you would a packing box, tucking the last one under the first one (so it stays shut on it's own, without the need of tape. Tape would hamper its drainage)
Fill with good soil and plant seeds in them! The great thing about them is when it comes time to transplant into larger pots or into garden beds, just unfold the bottom flaps and plant the whole thing (cardboard and all!) right into the ground. The cardboard will degrade, and before it does it helps retain moisture around the tender new roots! (However if it looks like the seedling is rootbound, just tear the cardboard away, it should be very soft from all the watering of the seeds you've done!) (by the way, to water them gently, we recommend a spray bottle) Here are some of our seedlings, the sugar snap peas are just about outgrowing their pots! 
Been a while, busybusy!
It's been a while since I've updated the ol' bloggityblog, but that doesn't mean I haven't been crafting! Since learning to crochet a month ago, I've made several really cute hats, and have even created my own pattern for them (and tested it several times to make sure I wrote it correctly!). Wyatt's is super cute, he still doesn't care for it to be on his head longer than a few seconds, but what are you gonna do? Hehe!

And here's his hat with another hat, same pattern but a size smaller, for an undisclosed baby's first birthday gift!

There is an interesting note circulating around facebook lately, where for the first 5 people who respond (who are not in your current circle of friends you see regularly), you will make them something -anything- and send it to them. (the catch, as with most chain things, is that they too have to post the same note and do the same for 5 of their friends. Cool, huh?) I decided to do it for the first 8 people, and I have until the end of the year to send them all homemade gifts. I'm excited about it! I imagine I'll probably stick pretty close to crafts I already do well enough to make them speedily, and it might be a few months if I'm going to include freshly made preserves and whatnot, but it's going to be fun. I've got a good mix of people to make gifts for, some old camp friends and old highschool friends (all of whom I haven't seen in years), and a few mommas from my webmd circle of mom friends, most of whom I've been in contact with since we were all pregnant together (I feel like I know them all, and even refer to them in conversation with Red and others, as though I see them every day! In fact, I do see them every day, but just on webmd or facebook!). It's a pretty cool experiment, the main point is to reconnect with old friends and such, but I like especially that it's a homemade handmade thing that you actually mail to them, rather than just sending someone an e-card or something... And what's also fun is it is getting people who wouldn't otherwise be inclined to be crafty into making handmade gifts. It's the best chain note I've ever seen, beats the pants off of silly quizzes or surveys or those stupid emails that say if you don't send this to 800 of your friends in the next 37 seconds your dog will bite your face off the next full moon... Gotta love those. At last, a note worth posting, one that is actually productive! (Not to say I've never filled out a survey or taken a quiz, but still...) In a world that is becoming faster and more into instant gratification, it's important to remember and appreciate that not all wonderful gifts or ways to connect with friends are point-and-click. (infact I would say that the most wonderful gifts or ways to connect with friends are most certainly not point-and-click.)
Sunday, March 1, 2009
Learned to crochet!
This week I learned how to crochet! My mother in law taught me, and after some trial and quite a bit of error, I got the hang of it. I have to say, while I'm much better at knitting, crocheting goes so much faster, and is much easier to customize (at least what I've messed around with has been.). I picked up a set of hooks and some cotton yarn at Walmart (and was very pleasently surprised by their yarn selection, no wools, everything was synthetic or cotton blends, but they had some nice stuff, including some gorgeous and very soft yarn made from 100% recycled plastic bottles! I almost bought a few skeins cause it was so nice and in beautiful colors, but I don't have a project picked out for them (and am in the middle of my Central Park Hoodie) so I have to be patient...) and set about to crocheting a few little random projects. I made a little dishtowel and a headband out of one of the cotton yarns, and then decided to try my hand at making a hat for our friends son Tyler's first birthday (which is today, sadly I am not feeling well and can't make it to the party...). I found a cute pattern for free on ravelry for a beanie with a little brim on it, though I didn't quite understand the pattern's terminology (it's quite different from knitting terminology), so I used the pattern as a basis for what to do, and customized it as I went for to make it right. I must say, for a first official garment, it turned out pretty damn cute! It's a 100% cotton variegated colored yarn, I had just enough to finish it with a little bit left over (it was a small 2oz skein). It's a bit big on Wyatt, and his head is pretty big, so I'm sure it will be too big on Tyler too, but it is damn cute, and could be shrunken if needed (or he'll just grow into it!). (once again, Wyatt wouldn't let me take a picture of him with the hat on, I managed to just catch him before he pulled it off, it's a great game for him!)

Since this hat was such a success, I've decided to crochet hats for all the Vallecito babies's first birthdays, (Tyler is the first in the stretch of five babies amongst our friends, Wyatt is next! Yikes!) all in different colors of course, but once they're all 1, the group picture should be super cute! Hehe! I just wish Wyatt liked to wear hats... Oh well, that's not going to stop me from making him one! Yay for crocheting!
Since this hat was such a success, I've decided to crochet hats for all the Vallecito babies's first birthdays, (Tyler is the first in the stretch of five babies amongst our friends, Wyatt is next! Yikes!) all in different colors of course, but once they're all 1, the group picture should be super cute! Hehe! I just wish Wyatt liked to wear hats... Oh well, that's not going to stop me from making him one! Yay for crocheting!
Friday, February 20, 2009
Impatient for warmer weather...
I am definately getting impatient for warmer weather here. For obvious reasons of course (ahem, no more snow! Get me out of this house!), but for crafting reasons as well! This past fall, we purchased two 20 foot metal cargo containers (like these). One will be for storage and a place to park our atv, and the other one will be Red's workshop. Unfortunately we got snow before Red finished his workshop (he has framed out the inside and insulated it, and has it wired for 110 and 220 electricity, though it is not yet wired into our electric meter yet, and still needs to be sheeted and shelves and workbenches built), but come spring he will finish out the inside, which means he'll be able to move all his tools out of our big shed, and the shed will then become my sewing/craft shed! It's an 8'x10' shed, and it currently sits in our driveway, though I think we will have it moved up to the back of the yard across from where the shop is. We will also probably insulate and sheetrock the interior, and hopefully install a window or two, and wire it, and then it's all mine! After sheetrocking it the interior dimensions will be closer to 7.5'x9.5', and since it's a shed roof the back wall is not quite standing height (it almost is for me, not even close for Red!), so it poses some interesting design issues, but I have a thing for designing small spaces so I'm excited for the challenge! It will primarily be set up for sewing, though I hope to have enough workable surface space for most other types of crafting, minus anything that requires water (unless I do watery stuff outside with the hose!). I do have a nice sewing center cabinet, though I'm not sure if I'll use that in there, or build custom shelving/counter/table space. I can't wait for the snow to be gone so we can get a start on all of this!
Monday, February 16, 2009
What I'm working on now
Right now I'm working on a new knitting project- the Central Park Hoodie (I guess it's a popular one in the knitting world!). It's a cableknit hoodie, and I'm knitting it in a beautiful and soft alpaca blend wool in a deep merlot shade (it's almost black looking, but in the sunlight glints with flecks of red and blue, it's really beautiful yarn). I'm about eight inches into the back piece (it's a button-up hoodie), and it's coming along nicely! The 4 inches of ribbing on the hem took forever it seemed, but the main pattern is going quickly (on size 8 Addi Turbo needles, I'm using circular needles even though it's not knit in the round, I just like the needles so much and the straight Addi Turbos are pretty pricey and my local knitting store doesn't carry the straights, just the circulars). I'm excited about it, it's going to be soft and pretty and cozy, and lightweight enough to be worn on our cool summer evenings (cause at this rate that's probably when I'll have it finished by) (I hope!) but warm enough to be cozy in the winter. Plus it's a color that I don't really have anything of in my closet, but I love the color, so it's best of all worlds! The pattern looks like it gets a bit complicated when it gets to the hood and the ribbed trim on the buttonfront edges, so I have a feeling I'll be making a visit to Yarn for some help, but I'm game for the challenge! Here's the first 8 inches (this photo does not do the yarn justice)

And a little pat on my own back for figuring out how to make text into links ;)
Friday, February 13, 2009
Making Paper!
Probably my most involved project to date has been making paper. It is a lot of fun to do, and though it is very easy, it does take up alot of time and space. You can get pretty complicated with it if you want, but a pretty basic setup will produce some pretty nice paper! It's a great use for recycling paper, especially bright construction paper. You can also put stuff in the paper, like dried leaves or flower petals, or even bits of thread make for some interesting paper.
I first was introduced to making paper in elementary school, it was a class project one day to make paper out of old newspapers, I remember we did it in the parkinglot because it was pretty messy but it was neat to see how it's done. Ironically, newspaper is just about the worst to use in your pulp because it yellows so quickly (so your newly made paper will yellow), but it got the point across!
I wish I had taken more pictures (any pictures, really) of the whole process, as it really is a process, but I do have some photos of the finished products of my paper. I made books out of the paper as Christmas gifts two Christmasses ago, and bookmaking is a whole other topic that is a lot of fun and you can get super creative with. If you can sew on a button, you can make a book. (Actually, if you can pass a needle and thread through anything, you can make a book)
Another time I will probably do a more indepth how-to for papermaking (cause it is so cool and fun and kindof on the uncommon side of crafts), but for now, here are some photos of the finished paper, and the books I made.
.JPG)
.JPG)
.JPG)
The cut paper, the full sheets with their raw edges, the first book, and some multicolored experimental sheets that came out too thick for the books.
.JPG)
.JPG)
The books!
Tuesday, February 3, 2009
Knitting projects
Here are a few knitting projects I've done and/or am working on! I started knitting when I was a kid, I really don't remember how old I was or even who taught me (I am pretty sure it was a friend of my parents), but I love knitting, I just wish I had more patience with it (I'm all about instant gratification, so big projects like sweaters are a real challenge for me!). I'm a fan of hats knit in the round (Addi Turbos are the best needles ever), they're quick and fun and satisfying. My favorite hat yarn is Lambs Pride Bulky, it's warm and thick so it knits quickly, and it's soft enough to be comfortable on your forehead without needing a lining. Here's one I knit many a year ago, I've kept it for myself.  Here's a hat that started out as the first in a pair of legwarmers that I started while in college but forgot about for several years. I found the project in my stash bag, and ended up turning it into a cute hat for Wyatt instead, with a big cushy pompom! Too bad he wouldn't keep it on his head long enough for me to get a good shot of it on! (Socks and hats are his nemisis, he loves pulling them right off!)


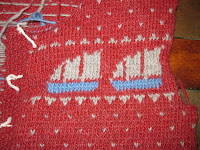
Here's a hat that started out as the first in a pair of legwarmers that I started while in college but forgot about for several years. I found the project in my stash bag, and ended up turning it into a cute hat for Wyatt instead, with a big cushy pompom! Too bad he wouldn't keep it on his head long enough for me to get a good shot of it on! (Socks and hats are his nemisis, he loves pulling them right off!) And of course, the dreaded never-ending sweater... I began this sweater in either 2002 or 2003, I can't recall. It's a Yankee Knitters design that I altered, the motif originally was sheep, but I designed a schooner motif instead. The back, left front, and about 8 inches of the right front are done, but that's about it... It's a beautiful sweater, but I've just lost the motivation to finish it (at least at the moment). Maybe someday I'll suck it up and finish it! ;P
Miscellaneous projects
Here are a few random projects I've done over the years!
A mosaic mirror

Candles- I made these from leftover candles that had burnt their wicks down but still had wax left. All I had to buy was the wick! (And cotton cord does the trick, you don't need anything fancy. I bought the cord at a local bead store.)
.JPG)
Christmas wreaths- These are made of paper plates with the center cut out, and bows stapled to the plates! (the sticky pad on the bows was not enough to keep them secure)

Yummy preserves! I love canning food, it's SO economical and so much fun! I've canned all sorts of jams- These here are peach, apple butter, plum, and sour cherry. The peaches and apples were locally picked, and the cherries were from our cherry tree! (the plums were from the grocery store, but if memory serves I'm pretty sure they were Colorado grown...) I've also canned soups, we've made turkey noodle and chicken noodle, beef stew, and a super yummy pasta sauce with tomatos and basil from our garden and sausage. Canning non-acidic foods (anything with meat, and pretty much anything that's not a jam) is a bit trickier, you have to use a pressure canner to get it hotter than you can just with a boiling water bath, but it's so worth it! They also make awesome Christmas prezzies!

Bath salt satchels- These were also Christmas gifts this year, and were so easy to make but so much fun! They are simply squares of muslin (cotton fabric) filled with epsom salts and either dried mint (from our garden) or dried rose petals (saved from various bouquets and such!), tied shut with ribbon! To use them you just put the whole thing in the tub and let the salt dissolve out. Next year I think I might try making essential oils of mint and lavender for them, so that the scent is a bit more potent than just the dried leaves (the leaves are very mild, and though they smell good, they don't scent the bathwater very much, so next time I'll try something a bit more scented).

Sunday, February 1, 2009
Couple more sewing projects

Here are two more that didn't make it into the first post- I have made Red two aprons now, the first was made of denim and lasted a good while of hard use while he was an automotive machinist. (It has since seen better days) This second apron I made out of cotton duck (like carhartt material) with a few pockets made to Red's specifications (gotta have a contractors pencil pocket!).

.JPG)
.JPG)
Friday, January 30, 2009
Past sewing projects
I've been sewing since I was a little girl, first making outfits for my Barbies, eventually getting into the 'hippie' clothing scene in highschool, making patchwork pants and funky cotton dresses and apron shirts. I learned to sew on an antique Singer sewing machine that used to belong to my grandma. It was beautiful, classic avocado green, and it dropped into a wooden sewing desk. It only went straight backwards and forwards (no embroidery stitches), but it did the trick! Then in my senior year of highschool, I upgraded to a new Singer with embroidery stiches (and my favorite feature, an automatic buttonhole maker!). .JPG)
.JPG)
At my highschool, every senior did a Senior Project in the spring for a month, and for my project, I designed and sewed (sewwed?) clothes. I made my graduation outfit, a satin tank with a matching satin and tulle skirt, a pair of funky patchwork pants that zipped into shorts,
 and my favorite peice, a skirt made entirely out of neck ties! I believe there are 44 ties in all, most of which I found at thrift stores, though quite a few were donated by my dad!
My hippie sewing style long gone, I then moved on to more traditional designs. I've made a few dresses and skirts, even tried my hand at lingerie (it's so much harder to get it to fit right. I'll leave that to Victoria's Secret).
A few falls ago I started my first quilt, a pretty easy pattern for 20 fat quarters, I think it was called "turning 20", it's a twin size quilt. It took me a couple years to finish, partially because quilting takes up a lot of space for a lot of time. Here's the finished quilt. It gets plenty of use on cozy nights in the livingroom! .JPG)

.JPG)

.JPG)
Most recently, I made my Halloween costume, I was Dorothy from the Wizard of Oz. I made this entirely from a pattern (one of the few times I've ever used a pattern for clothing, usually I use part of a pattern or none at all), and it's exactly as Dorothy's dress was in the movie (it's a lisenced pattern). And I glittered the shoes myself. (Wyatt was a flying monkey, I didn't make his costume but I did make his wings.)
Thursday, January 29, 2009
Welcome, me!
Well I've finally bit the dust and started an actual blog. I've had a livejournal for years, but have been seriously neglecting it as of late. Not to mention it's been an everythingandnothing sort of blog for me, much more like a diary than anything else, and is probably only interesting to me. I've wanted to start a 'real' blog for a while, I've admired many friends' blogs and wished I had one that at least had a theme or some sort of direction, but never really thought of anything that might be interesting to anyone else- until now that is! (wow, that does sound a bit conceited, but then again, I think all blogging is at least somewhat conceited...) So I've decided to make this blog (at least mostly) about my various crafting projects and general homemade activityness. I've always been into throwback crafting, things like knitting and sewing and more recently quilting, crafts that generally have an old lady stigma, but in reality have quite a strong following of younger people (and not just women). In recent years I've also delved into the worlds of food preserving, gardening, papermaking, bookmaking, candlemaking, all sorts of good stuff that is a ton of fun but also helps to lead me into a more sustainable lifestyle. Red (hubby) and I have dreams of homesteading, and though the age of claiming your land by simply building on it and fencing it are long gone (sadly...), the theories and activities of homesteading are still going strong, if not infact experiencing newfound interest, due to many factors (namingly the economy). For example, just about everyone we know did something homemade or handmade for Christmas gifts this year, and not just the standard tin of cookies. So all that being said, I figured a blog about handicrafts would be apropos of not only my life and lifestyle and interests, but might actually be something other people would find if not helpful, than perhaps interesting... Plus I just really like to write, and this gives me good direction.
There's also an underlying motive for this blog, and that is that I've been toying with the idea for a couple years now of opening a craft supply store and studio, so not just retail space but also offering classes and workshops, and workspace for projects, and all sorts of good stuff. In the past I haven't been the best boss of myself, and so partially this blog is hopefully going to help me stay motivated with my projects and act as a tool to measure just how dedicated to crafting I can be. Also, I'm hoping it can help me find even more direction for the shop, so I can figure out just what I want to do and offer with it. It would be a huge undertaking, starting a business -a REAL business- from scratch, but then again, any craft project is just that- creating something from nothing, and making it beautiful.
So for now, I'm going to share some past projects that I've done, and as I catch up on those, I'll share stuff I'm working on currently as well, and hopefully she'll grow from there. I'm not sure if this all will include how-to stuff or what, I guess that might be decided by what interest people have in my blog (if any). So if you do happen upon this blog, whether you're a fellow crafter or not, I'd love any feedback, on either projects or the blog itself or whatever else you'd like to see here. I want this blog to be for other people, not just for me (if you know what I mean). So in the meantime, while I try to catch up on taking photos of old projects and all that jazz, you can also find me on facebook, or on ravelry.com (I do still have a myspace but it has fallen to the wayside as of late).
Subscribe to:
Posts (Atom)