Showing posts with label Recipes. Show all posts

Tuesday, October 2, 2012

An apology and a recipe!

Oh dear... Another four month radio silence on my part. I have no good excuses. And what's worse, I have to break the promise I made back in June of a tutorial for the hammock chair swing I made. I never got around to perfecting how it's hung, and as it was, it just wasn't right. And now that the back porch is filling up with the winter's firewood, the swing is now in storage for the winter. So sorry to anyone who was hoping for that tutorial.

Despite yet another hiatus, this blog still seems to be getting halfway decent traffic, which surprises me (in a good way!), especially since it's been 4 months since my last post! (Since then it's still gotten several hundred page views!) So welcome to any new readers! Please forgive my trend (which will probably continue, what with Baby Zoe due to arrive in a month and a half or less!) of long periods of time between posts. I have great ambitions to be an awesome blogger, but just haven't been able to put them into practice yet ;)

All that said, with the hopes of making up for the long break between posts and the lack of the promised tutorial, I want to share a recipe I invented today when struck with a craving for donuts. Pregnancy cravings are a bitch, especially when you live so far from town that it's not possible to just go to the store to satisfy them. Case in point- two weeks ago, after having a conversation about favorite Thanksgiving recipes, I caved and spent a Saturday cooking an entire Thanksgiving meal, just for the three (and a half) of us. A pregnant girl's gotta do what a pregnant girl's gotta do. So when a craving for donuts struck while trolling Pinterest, I knew the only way I'd get my fix was to get up off my bum and get in the kitchen. I didn't want to fry anything though, and decided that I wanted something lemony, so I came up with what is really a sweet, lemony challah recipe. Challah, a traditional Jewish bread, is light and fluffy and all around awesome, since it's enriched with lots of egg, and I figured it would lend itself nicely to a little extra sweetness and flavor. I used butter in mine, but if you're keeping kosher, just use veggie or canola oil instead. I decided to do these as rolls, rather than a traditional braided loaf, so that I could play around with toppings, and also so you get the most exposed surface area to get that awesome golden flaky crunchy crust that challah is famous for. You could always do a traditional braided loaf, or even just plop the dough in a greased loaf pan and call it good. The hardest part is waiting (and salivating!) while the dough rises!


Lemon Challah rolls- makes about 12 rolls

In a large bowl, or in the bowl of a stand mixer, combine 2 1/4 tsp yeast (1 packet) and 1/2 cup *minus* 2 Tbsp warm water and let sit until the yeast is dissolved, about 5 minutes.

Meanwhile, in a small bowl, lightly beat 2 large eggs plus 2 large egg yolks. Add eggs to the yeast and water, then add 4 Tbsp salted butter, melted and slightly cooled (so it doesn't cook the egg when you add it), 5 Tbsp sugar, 1 tsp salt, 1/2 cup all purpose flour, and 3 Tbsp lemon juice (fresh will be best, but I used bottled cause it's what I had).  Stir (by hand with a wooden spoon or rubber spatula, or on low speed with the dough hook) until well combined. Gradually add 2 1/2 cups all purpose flour, mixing by hand or with the dough hook on low speed, until the dough is smooth, firm, and quite elastic (adding about 1/4 cup flour more, if needed).  Cover and let rise until doubled in size, roughly 2 hours.

With lightly floured hands, turn out the dough onto a lightly floured surface and knead it a few times. Break off balls about the size of a lime and roll them into balls, place them on a floured surface or on parchment, cover again and let rest and rise for about 30 minutes.

Preheat the oven to 375 degrees F.  In a small bowl, whisk 1 large egg with 1 1/2 tsp sugar or honey.  Grease and sprinkle cornmeal on a baking sheet, or line a sheet with parchment, and place the rolls a couple inches apart on the prepared baking sheet.  Brush each roll with the egg wash, and bake until the crusts are a rich, dark, golden brown, and the bottoms sound hollow when tapped, about 20-25 minutes (when in doubt, go a little longer!)

In the last couple minutes of baking, combine 1 Tbsp melted butter and 1 tsp lemon juice. As soon as the completed rolls are cool enough to handle (but still quite warm), brush the crusts with the lemon butter, and roll them in sugar, and allow to cool (or chow down right away, depending on how patient you may or may not be!). Enjoy!

Edit: Now that we've had a chance to enjoy them, I just want to add- these are not as sweet as a donut, but I think that's a good thing! The lemon is subtle, so if you want them to really be lemony, add at least a tablespoon of lemon zest. I would have, had I had an actual lemon, but I just had bottled lemon juice so I went with what I had. If you want something really sweet, try a liquid glaze (like on a glazed donut). Yeast donuts in and of themselves are not very sweet at all, it's all in the topping, so keep that in mind if you're in the mood for something sweeter. Personally, the subtle lemony sweetness of these is perfect, not cloying or heavy. They'll be awesome as a breakfast roll (you can bet that's what I'll be having tomorrow!). They should be stored in an airtight container, either at room temp or in the fridge (that's up to you. I never refrigerate bread, but some do, and that's fine.).


Friday, April 22, 2011

You can bake! And the ultimate pizza dough!

Since last fall, we've been baking all our own bread.  There's always a loaf on the counter or dough in the fridge (and usually there's both!).  Baking bread is so easy, and not at all the time consuming task non-regular bakers think of.  Baking seems to be enjoying a bit of a renaissance these days, and I want to spread the good word!

Bread Basics
Great bread is all about ratios.  Stick to the correct ratios, and you really can't go wrong!  The magic numbers are these: 1.5, 1.5, 3, 6.5.  That's 1.5 Tbsp yeast, 1.5 Tbsp salt, 3 cups water, and 6.5 cups flour.  It's so simple it's crazy!  And you can follow the same numbers for substituting, as long as the total numbers stay the same.  (Don't substitute anything for the yeast or salt, those are key ingredients!)  For example, I like a softer sandwich loaf, so I do 1.5 cups water and 1.5 cups milk.  As long as it's 3 total cups liquid, you're good to go.  Same goes with flour (though I don't recommend using more than half whole wheat, it makes for a very dense loaf).  I also like adding some sweetener (usually honey), but that doesn't follow a set ratio; I usually add a couple tablespoons of honey, I don't really measure (but it's not crucial to measure it).  Same goes for adding a fat (butter, oil).  I usually just add a few tablespoons.  

Mixing Method
In a large bowl (or a large stand mixer with a dough hook), add the liquid (room temp or slightly warmer, not hot but not cold), yeast, and salt, (and fat and/or sweetener if you're using it) and stir to dissolve the salt.  Then add in 6 cups of flour, and mix it all together with a wooden spoon (or on slow speed) (add the last .5 cup flour if it's too wet).  You want it to be fairly wet, but dry enough to feel elastic.  Don't mix with your hands if you can avoid it- this often leads you to add too much flour.  The dough should still be pretty dang sticky.  Cover it with plastic wrap, and let it sit for about 2 hours.  Don't worry about punching it down, or whether the volume doubles or triples.  It doesn't matter! The yeast knows what to do!  If you're not ready to bake after the 2 hours are up, pop it in the fridge.  It is wet enough to last several days to a week!
Elastic enough to form a ball, but the shape shouldn't last long!

Baking Time!
After the 2 hour rising mark, you're ready to shape.  This recipe works best for free form 'artisan' style loaves, rolls, etc.  (See below for sandwich loaf variation)  Flour your hands and your work surface liberally, and flour the top of the dough.  Liberally sprinkle corn meal on a baking sheet.  Grab a good hunk of dough, form it into a ball, and place it on the corn mealed baking sheet.  Allow to rise uncovered for half an hour.  A few minutes before baking time, preheat the oven to 450 degrees F.  Melt a tablespoon of butter (salted or unsalted, your choice) and gently brush the surface of each loaf.  Bake for at least 30 minutes, but possibly as much as 45, depending on the size of the loaf.  The top should be crisp and browned, not just golden.  Trust me, it's way better to overbake than underbake!  Allow to cool completely before slicing, if you can resist!

The Ultimate Pizza Dough
This recipe follows the same ratio, only on a 2/3rd smaller scale, and will make a beautiful big and fairly thick pizza (after all, delicious dough deserves a thicker crust!).  Follow the above ratio if you would rather make two medium pizzas, or one large and some breadsticks, etc.  

2 cups water
1 tbsp yeast
1 tbsp salt
1 tbsp sugar
2 tbsp olive oil
4 cups flour (I think it's best half white flour half whole wheat!)

Combine the first five ingredients as directed above, then add flour and mix and allow rise as directed above.  After the 2 hour rise, you're ready to shape your pizza.  You'll need a LOT of flour on your work surface and hands and rolling pin.  Preheat the oven to 450, and prepare your toppings.  Cover a baking sheet very liberally with corn meal.  Roll out your dough, flipping it over and adding flour to keep from sticking as needed, until it's as large and thick as you'd like it (for me, as big as my baking sheet will allow!).  Spread sauce, cheese, and toppings as desired, and bake for about 20 minutes until the cheese is hot and bubbly and the crust is golden.  Enjoy!!!

My Favorite Sandwich Bread

1.5 cups warm water
1.5 cups milk
1.5 Tbsp yeast
1.5 Tbsp salt
3 Tbsp honey
4 Tbsp unsalted butter, melted
3.5 cups all purpose flour
2 cups whole wheat flour
1 cup oat flour
1 cup rolled oats

Add first 6 ingredients as directed above, then add the flours and oats and mix.  Add either flour or liquid until it is elastic but still sticky.  Allow to rise as directed above.  After 2 hours, grease or spray a loaf pan with a neutral flavored oil.  Flour your hands and the top of the dough, and pull out half of the dough and form into a ball.  Stretch the ball slightly to elongate, and place in the prepared loaf pan.  Allow to rise another 45 minutes, uncovered.  (Do the same for the other half of the dough if you have two loaf pans. If not, you can make rolls, or refrigerate it for another day!)  Preheat oven to 450.  Melt a tablespoon of butter and brush the top of the loaf, and bake for 40 minutes or until deeply golden/browned.  This time, definitely wait until completely cooled before slicing.  

Thursday, March 10, 2011

Sprout-tastic!

This winter, we got a sprouting kit put together for us by Red's mom Kayla!  We both realized we missed salads and fresh greens SO badly, and storebought lettuce was remarkably disappointing after the awesome lettuce and greens we grew ourselves last summer.  Kayla has been sprouting for a long time, and helped us to get started with an awesome kit she assembled for us for Christmas.  Sprouts are delicious, crazy easy to grow, and amazingly nutritious.  It's a great way to get home grown nutrition in the winter!  Here is how we grow ours, but be sure to check out sproutpeople.org for everything you could possibly need to know about sprouting!  (They also carry seeds, sprouting equipment, all sorts of good stuff!)  

All we use to grow our sprouts are wide mouth quart sized mason jars with a small circle of non-metal window screen and the screw band that goes with the jar.  Other than seeds to sprout, that is all you need!  We have a great seed mix from sproutpeople.org that we LOVE that includes clover, arugula, cress, fenugreek and dill seeds.  It is the perfect mix, and tastes amazing on sandwiches, in burritos, and even by itself with a little dressing!  We tried sprouting mung beans, but didn't like the flavor, so now we stick to this seed mix.  To grow a quart of sprouts, it only takes about two tablespoons of these seeds, so it's a great value by volume!  

Step 1- Soak em!

First off, measure out your seeds according to the variety (different seeds will grow different amounts, so check on sproutpeople.org for how much to use so you get a good amount of sprouts but don't end up with an overstuffed jar).  Put the seeds in the jar, put the screen over the top and screw on the band.  Fill up the jar (through the screen) with cool water and let the seeds soak 8-12 hours (or however long is needed for the variety you are using, again, see sproutpeople for individual seed instructions).
Our favorite seed mix has some pretty small seeds, so we use two layers of screen until they begin sprouting and become big enough not to fall through the screen.

Step 2- Rinse, Repeat! 

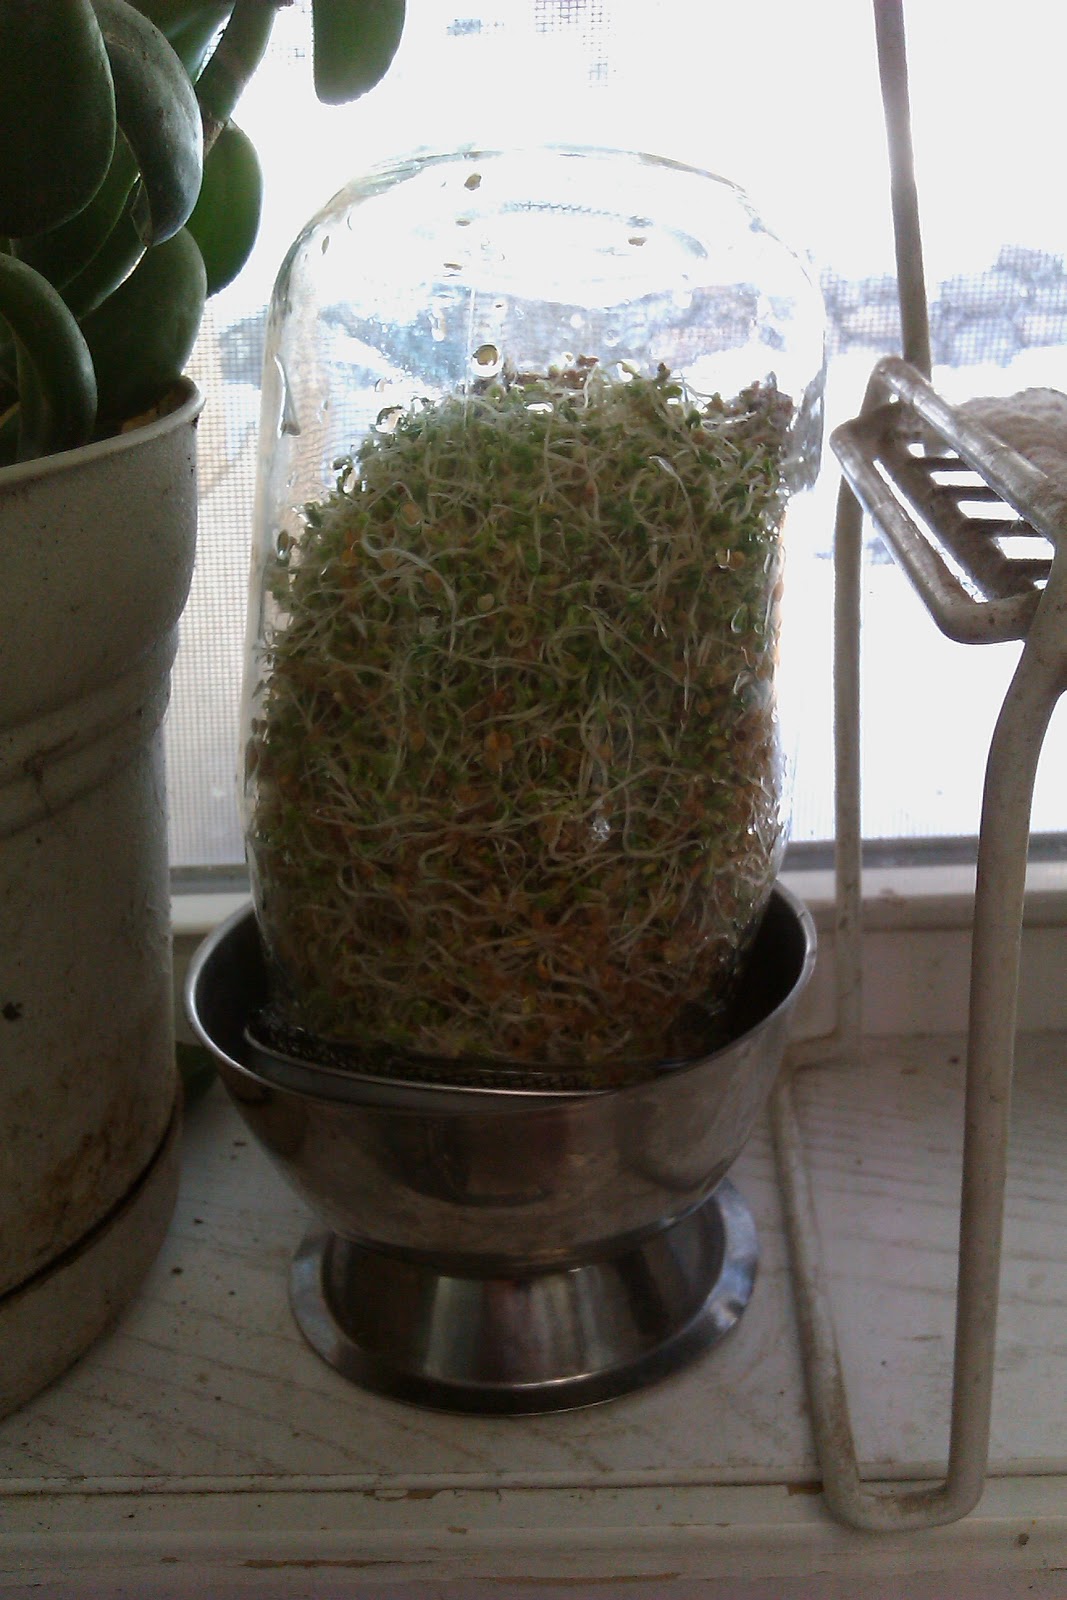
After your initial soak, drain the water out, fill with cool water, and swirl it around to make sure every little seed gets wet, then drain it off again, getting as much water out as you can.  Then tip the jar upside down and set it at an angle in a bowl, which will allow any leftover water to drain out without leaving the seeds too wet, and allow good airflow.  We keep ours on our kitchen windowsill, so we don't forget about rinsing them!  It doesn't get any direct sunlight this time of year so it's ok for us, but don't put your jars in direct sunlight.  I do recommend keeping them in or near the kitchen, so you'll be less apt to forget about them! 

   Rinsing; The first signs of growth, day 2

Repeat the rinsing and draining every 8-12 hours or so.  Doesn't have to be spot on timing wise, but you don't want the sprouts to dry out completely.  Since we keep ours by the sink, we usually rinse them in the morning while coffee is brewing, and again around dinnertime.  You will start to see the first signs of growth about 36 hours after you first put them up to soak (or sooner or later depending on the variety of seed).  At first the sprouts will be short, spindly and white, but once they get started, they really take off!  You'll notice the hulls of the seed start to fall off once the leaves start to form, around day 4-5.  
Here are our sprouts at about day 5. Notice the brown hulls of the seeds- they fall off on their own, but are still edible.  We don't bother with separating them out, though most end up in the bottom of the jar anyways.
We keep two jars going at different intervals to keep a steady supply of sprouts growing.  
These jars are at day 5 and day 2, respectively.

Step 3- Enjoy!

We've started eating our sprouts as early as day 4, but they are best when they've had a chance to get bigger and greener, around day 6 or 7.  We store our sprouts in the jars on the sill just like when they're growing, since they usually get eaten quite quickly.  But if you'd like to store your sprouts for longer, they will need one final rinse, then a thorough drying out (try a salad spinner or laying them out on a paper towel), and will need to be stored in an airtight container in the fridge (you could store them in the jar they were grown in, just replace the screen with the regular lid).  We've never gotten to that point, since we eat them too quickly!  They are amazing on sandwiches or in burritos or fajitas, and we've even eaten them by themselves in a bowl with a little dressing, like a micro-salad!  Wyatt even loves them, and stuffs them into his mouth by the handful!  They're so tasty, it's a wonder it took us this long to do our own sprouts!  Yum!


Wednesday, February 9, 2011

Orville Redenwhateverhisnameis ain't got nothin on me!

I don't know about you guys, but lately, we've been broke, so what doesn't get spent on bills goes to grocery essentials like milk and eggs, with no room for splurges on snack foods.  This is just fine with me, cause processed food only tastes good until you look at the ingredients label... (And if it still tastes good after that, well...)  So part of our new routine is coming up with yummy snacks from scratch.  We do variations on bread, and that's great, and I've tried making crackers and things, but nothing quite satisfies cravings for something salty and/or sweet and/or crunchy like kettle corn! (in fact it satisfies all three all at once!)  I don't really like buttered or plain popcorn, but kettle corn I could go nuts for (and do), but didn't know how to make it myself.  Sure, a package of microwave popcorn is super easy and quick, but it is not cheap considering what popcorn actually is... Plus who knows what weird stuff is in the microwaved kind (I don't know, since I don't have any on hand, but use your imagination)  After doing some research online and a few trial runs, I have successfully made the most awesome, delicious, addictive, and cheap snack food ever.  If you've never popped corn on the stove (and I don't mean in one of those UFO foil thingies), there is nothing to be scared of if you pay attention to what you're doing, and the end result is even better than the microwaved kind and takes the same amount of time.  And now, without further ado, but without a photo cause I ate it all before I could take a picture cause it was too damn good, my recipe for homemade kettle corn!

What you need-
A large sauce pot with a good fitting lid, preferably see through (the lid)
oven mits or potholders if the pot and lid have metal handles
about 1/4 cup vegetable oil (enough to completely coat the bottom of the pan, but not be deep)
1/4 cup popping corn
2-3 tablespoons white sugar
salt to taste

What to do-
Put the oil in the saucepan, and place three corn kernels in the pan, and turn on the heat (medium-high is good).  Wait until all three kernels pop, and pour in the rest of the kernels.  Holding the lid on tight, every 10 seconds or so lift the pot and shake it around to keep the kernels or any popped kernels from burning.  Once about half the kernels are popped, carefully pour in the sugar (but beware as kernels might fly out of the pot if you take the lid too far off.  It's best to have the sugar in one container that you can dump in all at once rather than dumping the sugar in a spoonful at a time).  Adding the sugar will slow if not stop the popping, but keep shaking the pot every few seconds to help distribute the sugar and keep the kernels and sugar from burning.  The rest of the kernels should pop within a minute or so.  When the popping slows to one pop every couple seconds (just like when you microwave popcorn), quickly dump all the popcorn into a bowl.  (It's not enough to take the pot off the heat, if you leave the popcorn in there the sugar will burn and so will the popcorn)  Sprinkle on some salt and stir the popcorn around with a spoon *IT WILL BE EXTREMELY HOT!!!* Don't burn yourself on molten sugar!  Let the popcorn cool a bit before you enjoy!  It will be so worth the wait!

That all may sound involved, but it really isn't!  The whole process takes maybe 4 minutes, and the end result is SO much better than anything out of the microwave!  You can fiddle with the amount of sugar and salt, and most recipes I found say to add the sugar at the same time as the kernels, but I found that adding it halfway through the popping practically eliminates any risk of burnt sugar, while still giving an even coating.  This recipe will yield a big bowl of popcorn, certainly enough for me and Wyatt to share, but if you're serving a crowd or just really really love popcorn, feel free to double it (but keep in mind you'll need a pretty big sauce pot).  I'm not sure how much one bag of microwave popcorn costs, but I have a feeling it's much much more than what this recipe costs, which I estimate to be around $0.10 total.  (The $2.50 bag of popping corn I bought yesterday yields 28 servings at 1/4 cup per serving (and I'm sure you can find popping corn for cheaper than that, but I happened to be in a specialty grocery store), which is $.08 per serving, plus a trivial amount of oil and sugar and salt, which I am generously valuing at $.02)  I can't think of ANYTHING that you can get a big bowl of for only ten cents... Not potato chips, not even flour or milk or bottled water or rice or anything!

And if you're a crazy person and don't like kettle corn (but I can't imagine why anyone wouldn't, especially not the homemade kind), you can always stick to plain ol' salt on your popcorn, or melt a little butter, or a personal fave of mine- nutritional yeast and Parmesan cheese!  (Seriously, if you've never had nutritional yeast on popcorn, do yourself a favor and go buy some! It is SO yummy (and not just on popcorn) and really good for you, lots of B vitamins!)

Now if they could only invent a popping corn that doesn't have the annoying shell of the kernel part that always gets stuck in your teeth... ;)

Friday, December 31, 2010

Le Grand Fromage!

While I'd like to think we'd come up with all these ideas for homesteady things to do on our own, I have to give credit where credit is due, and in most cases it's due at least in part to Mother Earth News magazine.  If anything  I write here interests you, I can pretty much guarantee you'll love Mother Earth News.  Maybe this shout out will even get back to their editors and they'll ask me to write for them?  Now wouldn't that be bonkers! ;)  They've featured several articles over the years on home cheesemaking, and it was on my list of things to try for a long time.  I've now made cheese three times, with varying results, but it's something I definitely want to work on and learn more about!  Especially since it is so crazily easy!!!

My first attempt at cheesemaking was a mozzarella recipe in their June/July 2008 issue.  While I thought I was doing things correctly, the end result was much more like ricotta or very small curd cottage cheese than anything shapeable like fresh mozzarella should be.  Tasty nonetheless, but not what I was hoping for.  Like anything new, one should never give up after a failed first attempt, so later that week I tried my hand again at the mozzarella and discovered my error the first time (didn't get the curds hot enough, and stirred too much!) and was successful!  I actually was a little too successful, and the result was much firmer and dryer than true fresh mozzarella, and more like regular mozzarella... (Not sure what to call it, since it usually is only found in grated or string cheese form...)  I ended up using it in a pasta dish, and it was incredibly stringy and delicious! It would have made perfect pizza cheese!  Now that I know I can make ricotta and pizza mozzarella, next time I'll try a third time and maybe I'll get the recipe right and get fresh mozzarella!
It's amazing how little cheese comes out of so much milk- this is the result from a whole gallon of milk!

My third and most recent cheesemaking adventure occurred this morning, when I tried my hand at making cream cheese!  Unlike the mozzarella (which required rennet and citric acid), the cream cheese didn't require any special ingredients- just milk, salt, and white vinegar.  I have yet to have some on a bagel, but I did taste it  on its own and the flavor beats the pants off of Philly!  The texture isn't quite as smooth as storebought cream cheese, but I have a feeling that the texture could be improved, possibly by draining it longer, using whole milk (I used 2%, cause it's what I had on hand) or even just giving it a good stir.  Next time, I think I'll substitute some buttermilk in place of some of the milk, and see how that turns out.

The only bummer to home cheesemaking (if you don't have a dairy cow or easy access to truly fresh milk) is that you can't use most organic storebought milk.  Most organic milk companies ultra-pasteurize their milk, pasteurizing at a higher heat than regular pasteurizing, which kills more of the natural bacterias in the milk.  It gives milk a much longer fridge life, which is great, but unfortunately in cheesemaking, you need that bacteria to help the curding process along.  Fresh, unpasteurized milk would be ideal, and I hope to find a supplier in the spring, but until then, regular ol' storebought milk is the answer.

Crazy Easy Cream Cheese
1 quart milk (I used 2% but whole would probably be better)
2 tsp salt (non-iodized, kosher is my preference)
2 tbsp white vinegar

In a saucepot, bring milk and salt just to a boil very slowly over low heat, stirring occasionally.  Remove from heat, and stir in the vinegar.  Let it sit undisturbed until cool.  Pour into a cheesecloth or muslin bag, or a very fine mesh sieve, and let drain until it looks like cream cheese.  Store in the fridge and enjoy!  (How easy is that?!?)

Monday, May 17, 2010

30 Minute Project- Clothespin Bag!


30 minute project- Clothespin Bag!
I got the idea for this bag one, by the awesome weather we're finally having (perfect for drying laundry outside!) and two, from checking out ideas on the internet (just do a google image search for "clothespin bag" and you'll see lots of cute stuff!). I make no claim to the design though, since I kind of copied one I saw pictured online. I made it in about half an hour, probably less even, and I'm hoping that this will be the first in a series of quick projects, ones I hopefully can do start to finish during naptime! :D

This project uses a single fat quarter of fabric. What's a fat quarter, you say? If you're not into quilting (or cute fabric hoarding, like me), you might not know that a fat quarter is a 1/4 yard of fabric, but cut in such a way that it's 'fat', not long and narrow like if you asked for a 1/4 yard of fabric cut for you at the craft store. Most places sell fat quarters already cut, since it's a quilting thing. Even my Walmart's puny fabric section has fat quarters, both individually and in bundles of coordinating fabrics. You could go the high-tech route and make this out of a weatherproof fabric, like a coated ripstop like a tent is made out of, but they don't usually come in cute patterns, so I opted for a funky batiq cotton instead ;)

Materials-
Fat quarter of cute fabric
Children's size coat hanger (not wire)
bias tape or ribbon to match

Step 1- Cutting the pattern-
Fold the fat quarter into a square, and trim the extra edge (keeping the selvage edge of the fabric, if there is one)
Fold it into another triangle, with the first folded edge on the bottom (This will make the bottom of the bag), and place the hanger on top as shown below, halfway along the hanger, with enough room at the edge of the hanger for a seam allowance.

Trim the sides and the top edge as shown below, leaving adequate seam allowance.

Next, unfold the fabric, and refold it the long way once. Cut a keyhole shaped hole, large enough to fit your hand in easily, but keeping the bottom fold of the bag in mind (so don't make the hole too far down, or the pins will spill out!)
This is what your fabric should look like once all the cuts are made, and completely unfolded.

Step Two- Bias tape-
sew the bias tape or ribbon to the edges of the keyhole opening. I machine basted the ribbon to the wrong side of the fabric first, then folded it over the edge of the fabric and sewed it to the right side, using a decorative zig zag stitch (which also helps the ribbon to lie flat and hold the opening open when completed)
Also sew a piece of bias tape or ribbon to the top edge of the back of the bag (I just basted it on)

Step Three- Assembly-
Next, bring the RIGHT SIDES TOGETHER, and sew along the edge seams of the bag, starting at the top of the keyhole opening to ensure evenness as you sew towards the folded bottom edge of the bag.

Here's the completed bag, inside out. Trim any ribbon/tape ends and thread, turn right side out, and...

Add the hanger and VOILA! Ready to go!

A nice full load of pins!
Sure beats struggling to stick the pins back on the line when your arms are full of clean laundry! :D