
Showing posts with label For the Homestead. Show all posts
Showing posts with label For the Homestead. Show all posts
Monday, May 14, 2012
One more indispensable book for your library!
I can't believe I forgot to include the Ball Blue Book Guide to Preserving in my list yesterday! Preserving food is a big part of our homesteading life, and it is one of the easier ways to make a difference in your food bill's bottom line. Whether you grow your own foods to preserve, harvest from the wild, or take advantage of produce sales in season, canning and other preserving methods are staple skills to learn. While The Encyclopedia of Country Living definitely covers food preservation, the Ball Blue Book is such an easy reference with great and easy to follow instructions for all types of food preservation, and more recipes than you could probably use in your lifetime.
Sunday, May 13, 2012
Indispensable resources for your homestead's library
This morning as I looked at our bookshelves, I wondered how much we could have accomplished without the aid of some pretty fabulous books we own. I have a feeling that without them, we'd have muddled things up pretty badly. So I thought it would be a good idea to share the books and resources that we think are indispensable, ones we return to regularly and not just ones we read once and call it good. I should add that I am in no way being compensated or bribed to mention any of these, and though I'll provide Amazon links to them, I'm not getting any commission or anything whatsoever. These books are just that good. And though I call it your homestead's library, you don't have to have a big garden or livestock or even a back yard to learn valuable and useful information from any of these books that you can then apply to your day to day life. Your homestead could be anything from an apartment to a sprawling ranch. If you are able to incorporate homemade/handmade/homegrown/DIY anything into your life, I consider that homesteading. It's a way of life rather than a type of dwelling. So, that said (and keeping in mind there are hundreds of books out there that I'm sure are great but that we haven't read or don't own), here are the books that have helped us immensely along the way!
The Encyclopedia of Country Living by Carla Emery- If your library had room for only one book, this would be it. It has a wealth of in-depth information on everything from buying land to growing food and raising livestock to recipes for that food and livestock to how to birth a baby in an emergency. Many other encyclopedia type books give general and short descriptions or information, but The Encyclopedia of Country Living is where to go to find out the details. (I'd say look no further, but then you wouldn't need any of the other books I'm about to recommend, and this would be a pretty short blog post. Even though you probably could look no further...)
Mother Earth News Magazine- Ok, not a book, but just as important to us as The Encyclopedia of Country Living, and it is the one and only magazine that we regularly re-read old issues of. Also, it is one of the most read magazines in the country, not in overall readership numbers, but in that its readership literally reads the whole magazine, cover to cover, every issue. Also, every article ever printed is available for free online on their website (along with countless online-only articles and blogs), and if you prefer to own the information but don't have room for every back-issue, they offer a collection of cd-rom disks with every article from every issue since the magazine began in 1970. Seriously, if you care about self-sufficiency, raising quality food (flora and/or fauna), or being good stewards of our land, get a subscription. You won't regret it!
Back to Basics by Abigail Gehring- Consider this one a less in-depth but more visual version of The Encyclopedia of Country Living. Most topics are covered in a single page or two, so it's by no means exhaustive, but it's fun to read through and has great diagrams and photos of lots of different DIY ideas for all around the home and farm.
Rodale's Illustrated Encyclopedia of Organic Gardening- Though growing your own food is a big part of modern homesteading, I'm only going to include one book on gardening, and this is it. It's much more about technique than specific information about individual plants. If you're looking for a guide with info on individual plants, there are zillions of books out there like that, all good in their own ways, and if you can find one that is specific to your region, the better (for example, Sunset's Western Garden Book is great if you live in or west of the Rockies). But if you want to learn HOW to garden organically (the best way, and what should be the only way), then Rodale's is the place to go. It's one thing to look up that a certain plant likes a rich, well drained, loamy soil, but those books don't usually tell you how to make your soil rich, well draining, and loamy (or even what loam is). Rodale's does, and then some.
Encyclopedia of Herbal Medicine by Andrew Chevallier- This is an absolutely excellent resource if you wish to reduce your dependence on conventional medicines. Whether you grow your own herbs, or buy supplements from a store, this will tell you what to look for to help with all sorts of ailments. I've successfully fought off multiple ear infections that otherwise would have needed full courses of antibiotics, with information from this book. (Disclaimer- I'm not saying you should ditch going to the doctor in favor if this book, but it is very helpful, especially in a pinch if you can't get to the doc quickly enough, or in conjunction with conventional meds from your doc.)
Artisan Bread in Five Minutes a Day by Jeff Hertzberg and Zoe Francois- We haven't bought storebought bread in nearly two years thanks to this book (which we learned about thanks to Mother Earth News). This book was an excellent stepping stone to getting creative on our own with our breadmaking, which is totally doable and not scary once you've mastered the techniques and understand the processes in this book. There is another similar version of this book, Healthy Bread in Five Minutes a Day (same authors), that is essentially many of the same recipes, but with more whole grains used, and less salt (though once you are comfortable with the basic recipes and techniques, those are modifications you can make without a specific recipe, so adding one or the other book to your library would probably be sufficient, unless you're uncomfortable with baking without a specific recipe, which is totally understandable).
One of the easiest ways you can incorporate homesteading into your daily life is by making your meals from scratch and not eating out, and two great cookbooks to help you do that are How to Cook Everything by Mark Bittman, and The All New Joy of Cooking by Irma Rombauer, et. al. (these are both links to the editions I have, though there are newer editions of both cookbooks). Both books are very similar, so you could easily get away with just one (and of the recipes I've tried out of both books, Mark Bittman's versions tend to involve less butter, so make of that what you will, teehee), but they are great for learning the basics as well as more complex recipes, and they both include techniques that are important tools, not just recipes.
Homemade by Reader's Digest- Consider this a cookbook not only for edible goods but also many household goods. I'm a big fan of many Reader's Digest books, and this one doesn't disappoint.
Crafts and Hobbies by Reader's Digest- This is an older book, but is a lot of fun and great inspiration if you want to try your hand at traditional and useful handicrafts for the home. Reader's Digest makes a lot of great craft type books, and I'm also a fan of their Complete Guide to Needlework and their New Complete Guide to Sewing, though keep in mind the latter should really be called the Complete Guide to Garment Sewing, as it is almost exclusively garment related techniques, and though it is a new edition, the projects included are, well, dated. (This version has a sticker on the cover that says the projects are new, so maybe they are, but my edition has some pretty special looking projects despite having the same cover, though without that sticker.)
Emergency Food Storage and Survival Handbook by Peggy Layton- Self-sustainability is not just about making your own food or clothing or what have you, but also your ability to sustain yourself should the worst happen. Food storage didn't used to be a 'weird' or 'survivalist' thing, it was absolutely necessary from a day to day life standpoint (and not so long ago, I might add). Just because most Americans have easy access to well-stocked supermarkets now doesn't mean you should become complacent. We by no means believe in silly Doomsday prophecies or anything like that, but disasters (both natural and man-made, widespread or personal (like an injury that keeps you from being able to work) can occur anywhere at any time, and can affect your ability to aquire food for days or even weeks at a time, and so being able to feed yourself and your family and keep them safe and healthy until things return to normal is a responsibility that many of us would struggle with today without a little forethought. This book will help you become self-reliant should the worst happen (God forbid), and will help you determine the best foods for long-term storage and how to prepare them if you need them. (Also, many long-term storage capable foods are foods we use on a regular basis as our staple foods, such as wheat berries and dried beans, so you don't have to stock up your pantry with stuff you'll never use, and they're much more affordable than their ready-to-eat counterparts.)
And that is my list for you today. I'm sure there are many other wonderful books out there that are deserving to be on this list, but these are the ones we have found to be truly useful to us, and I hope that they might be useful to you as well! Happy reading!
Wednesday, February 9, 2011
Orville Redenwhateverhisnameis ain't got nothin on me!
I don't know about you guys, but lately, we've been broke, so what doesn't get spent on bills goes to grocery essentials like milk and eggs, with no room for splurges on snack foods. This is just fine with me, cause processed food only tastes good until you look at the ingredients label... (And if it still tastes good after that, well...) So part of our new routine is coming up with yummy snacks from scratch. We do variations on bread, and that's great, and I've tried making crackers and things, but nothing quite satisfies cravings for something salty and/or sweet and/or crunchy like kettle corn! (in fact it satisfies all three all at once!) I don't really like buttered or plain popcorn, but kettle corn I could go nuts for (and do), but didn't know how to make it myself. Sure, a package of microwave popcorn is super easy and quick, but it is not cheap considering what popcorn actually is... Plus who knows what weird stuff is in the microwaved kind (I don't know, since I don't have any on hand, but use your imagination) After doing some research online and a few trial runs, I have successfully made the most awesome, delicious, addictive, and cheap snack food ever. If you've never popped corn on the stove (and I don't mean in one of those UFO foil thingies), there is nothing to be scared of if you pay attention to what you're doing, and the end result is even better than the microwaved kind and takes the same amount of time. And now, without further ado, but without a photo cause I ate it all before I could take a picture cause it was too damn good, my recipe for homemade kettle corn!
What you need-
A large sauce pot with a good fitting lid, preferably see through (the lid)
oven mits or potholders if the pot and lid have metal handles
about 1/4 cup vegetable oil (enough to completely coat the bottom of the pan, but not be deep)
1/4 cup popping corn
2-3 tablespoons white sugar
salt to taste
What to do-
Put the oil in the saucepan, and place three corn kernels in the pan, and turn on the heat (medium-high is good). Wait until all three kernels pop, and pour in the rest of the kernels. Holding the lid on tight, every 10 seconds or so lift the pot and shake it around to keep the kernels or any popped kernels from burning. Once about half the kernels are popped, carefully pour in the sugar (but beware as kernels might fly out of the pot if you take the lid too far off. It's best to have the sugar in one container that you can dump in all at once rather than dumping the sugar in a spoonful at a time). Adding the sugar will slow if not stop the popping, but keep shaking the pot every few seconds to help distribute the sugar and keep the kernels and sugar from burning. The rest of the kernels should pop within a minute or so. When the popping slows to one pop every couple seconds (just like when you microwave popcorn), quickly dump all the popcorn into a bowl. (It's not enough to take the pot off the heat, if you leave the popcorn in there the sugar will burn and so will the popcorn) Sprinkle on some salt and stir the popcorn around with a spoon *IT WILL BE EXTREMELY HOT!!!* Don't burn yourself on molten sugar! Let the popcorn cool a bit before you enjoy! It will be so worth the wait!
That all may sound involved, but it really isn't! The whole process takes maybe 4 minutes, and the end result is SO much better than anything out of the microwave! You can fiddle with the amount of sugar and salt, and most recipes I found say to add the sugar at the same time as the kernels, but I found that adding it halfway through the popping practically eliminates any risk of burnt sugar, while still giving an even coating. This recipe will yield a big bowl of popcorn, certainly enough for me and Wyatt to share, but if you're serving a crowd or just really really love popcorn, feel free to double it (but keep in mind you'll need a pretty big sauce pot). I'm not sure how much one bag of microwave popcorn costs, but I have a feeling it's much much more than what this recipe costs, which I estimate to be around $0.10 total. (The $2.50 bag of popping corn I bought yesterday yields 28 servings at 1/4 cup per serving (and I'm sure you can find popping corn for cheaper than that, but I happened to be in a specialty grocery store), which is $.08 per serving, plus a trivial amount of oil and sugar and salt, which I am generously valuing at $.02) I can't think of ANYTHING that you can get a big bowl of for only ten cents... Not potato chips, not even flour or milk or bottled water or rice or anything!
And if you're a crazy person and don't like kettle corn (but I can't imagine why anyone wouldn't, especially not the homemade kind), you can always stick to plain ol' salt on your popcorn, or melt a little butter, or a personal fave of mine- nutritional yeast and Parmesan cheese! (Seriously, if you've never had nutritional yeast on popcorn, do yourself a favor and go buy some! It is SO yummy (and not just on popcorn) and really good for you, lots of B vitamins!)
Now if they could only invent a popping corn that doesn't have the annoying shell of the kernel part that always gets stuck in your teeth... ;)
Friday, December 31, 2010
Le Grand Fromage!
While I'd like to think we'd come up with all these ideas for homesteady things to do on our own, I have to give credit where credit is due, and in most cases it's due at least in part to Mother Earth News magazine. If anything I write here interests you, I can pretty much guarantee you'll love Mother Earth News. Maybe this shout out will even get back to their editors and they'll ask me to write for them? Now wouldn't that be bonkers! ;) They've featured several articles over the years on home cheesemaking, and it was on my list of things to try for a long time. I've now made cheese three times, with varying results, but it's something I definitely want to work on and learn more about! Especially since it is so crazily easy!!!
My first attempt at cheesemaking was a mozzarella recipe in their June/July 2008 issue. While I thought I was doing things correctly, the end result was much more like ricotta or very small curd cottage cheese than anything shapeable like fresh mozzarella should be. Tasty nonetheless, but not what I was hoping for. Like anything new, one should never give up after a failed first attempt, so later that week I tried my hand again at the mozzarella and discovered my error the first time (didn't get the curds hot enough, and stirred too much!) and was successful! I actually was a little too successful, and the result was much firmer and dryer than true fresh mozzarella, and more like regular mozzarella... (Not sure what to call it, since it usually is only found in grated or string cheese form...) I ended up using it in a pasta dish, and it was incredibly stringy and delicious! It would have made perfect pizza cheese! Now that I know I can make ricotta and pizza mozzarella, next time I'll try a third time and maybe I'll get the recipe right and get fresh mozzarella!

My first attempt at cheesemaking was a mozzarella recipe in their June/July 2008 issue. While I thought I was doing things correctly, the end result was much more like ricotta or very small curd cottage cheese than anything shapeable like fresh mozzarella should be. Tasty nonetheless, but not what I was hoping for. Like anything new, one should never give up after a failed first attempt, so later that week I tried my hand again at the mozzarella and discovered my error the first time (didn't get the curds hot enough, and stirred too much!) and was successful! I actually was a little too successful, and the result was much firmer and dryer than true fresh mozzarella, and more like regular mozzarella... (Not sure what to call it, since it usually is only found in grated or string cheese form...) I ended up using it in a pasta dish, and it was incredibly stringy and delicious! It would have made perfect pizza cheese! Now that I know I can make ricotta and pizza mozzarella, next time I'll try a third time and maybe I'll get the recipe right and get fresh mozzarella!

It's amazing how little cheese comes out of so much milk- this is the result from a whole gallon of milk!
My third and most recent cheesemaking adventure occurred this morning, when I tried my hand at making cream cheese! Unlike the mozzarella (which required rennet and citric acid), the cream cheese didn't require any special ingredients- just milk, salt, and white vinegar. I have yet to have some on a bagel, but I did taste it on its own and the flavor beats the pants off of Philly! The texture isn't quite as smooth as storebought cream cheese, but I have a feeling that the texture could be improved, possibly by draining it longer, using whole milk (I used 2%, cause it's what I had on hand) or even just giving it a good stir. Next time, I think I'll substitute some buttermilk in place of some of the milk, and see how that turns out.
The only bummer to home cheesemaking (if you don't have a dairy cow or easy access to truly fresh milk) is that you can't use most organic storebought milk. Most organic milk companies ultra-pasteurize their milk, pasteurizing at a higher heat than regular pasteurizing, which kills more of the natural bacterias in the milk. It gives milk a much longer fridge life, which is great, but unfortunately in cheesemaking, you need that bacteria to help the curding process along. Fresh, unpasteurized milk would be ideal, and I hope to find a supplier in the spring, but until then, regular ol' storebought milk is the answer.
Crazy Easy Cream Cheese
1 quart milk (I used 2% but whole would probably be better)
2 tsp salt (non-iodized, kosher is my preference)
2 tbsp white vinegar
In a saucepot, bring milk and salt just to a boil very slowly over low heat, stirring occasionally. Remove from heat, and stir in the vinegar. Let it sit undisturbed until cool. Pour into a cheesecloth or muslin bag, or a very fine mesh sieve, and let drain until it looks like cream cheese. Store in the fridge and enjoy! (How easy is that?!?)
Wednesday, December 8, 2010
Our root cellar!
This fall, we finally built our root cellar! Well, not so much a cellar as a shed... We built it over the existing crawlspace access on the side of the house, so we can use the constant temperature of the crawlspace as a heating source in the winter and cooling source in the summer. Go geothermal! Since in Colorado you can't add directly onto a mobile (dumbest. law. ever.), we had to build it 'adjacent' to the house, but it's right up against it, which also helps in temperature regulation (in fact, the wall up against the side of the house isn't even insulated). We do have to keep the crawlspace trap door open, and with the help of a single incandescent bulb, we're able to keep it a very constant temperature of 40 degrees, even when it's dipped down to 0 outside at night! Without the light bulb on, it gets down to about 33, which is just a wee bit cold for our liking. But 40 is perfect! And it makes an awesome wine/beer cellar!!!

It's not sided yet, but it's functional!


That's looking under the house- Not too comfortable to get down under there, but it's great for critter-proof buckets of stuff we have multiples of. Those buckets have wheat grain in them- the real deal!

Great bucket storage for wheat berries, flour, sugar, beans, etc., and non-perishables that aren't in critterproof containers are in that big rubbermaid tub on the floor. We've also got a good stash of household items!

Home-canned goods look so pretty on the shelves!

The downside of having to leave the trapdoor open- Watch that first step, it's a doozy!
And there's the root cellar! It's not quite as full as we'd like it to be, but it's a start! Plus it frees up a TON of cabinet space in the house, which is a precious commodity as it is! I hope it's as much of a success in the summer as it is in the winter- only time will tell!
Monday, May 17, 2010
30 Minute Project- Clothespin Bag!

30 minute project- Clothespin Bag!
I got the idea for this bag one, by the awesome weather we're finally having (perfect for drying laundry outside!) and two, from checking out ideas on the internet (just do a google image search for "clothespin bag" and you'll see lots of cute stuff!). I make no claim to the design though, since I kind of copied one I saw pictured online. I made it in about half an hour, probably less even, and I'm hoping that this will be the first in a series of quick projects, ones I hopefully can do start to finish during naptime! :D
This project uses a single fat quarter of fabric. What's a fat quarter, you say? If you're not into quilting (or cute fabric hoarding, like me), you might not know that a fat quarter is a 1/4 yard of fabric, but cut in such a way that it's 'fat', not long and narrow like if you asked for a 1/4 yard of fabric cut for you at the craft store. Most places sell fat quarters already cut, since it's a quilting thing. Even my Walmart's puny fabric section has fat quarters, both individually and in bundles of coordinating fabrics. You could go the high-tech route and make this out of a weatherproof fabric, like a coated ripstop like a tent is made out of, but they don't usually come in cute patterns, so I opted for a funky batiq cotton instead ;)
Materials-
Fat quarter of cute fabric
Children's size coat hanger (not wire)
bias tape or ribbon to match
Step 1- Cutting the pattern-
Fold the fat quarter into a square, and trim the extra edge (keeping the selvage edge of the fabric, if there is one)

Fold it into another triangle, with the first folded edge on the bottom (This will make the bottom of the bag), and place the hanger on top as shown below, halfway along the hanger, with enough room at the edge of the hanger for a seam allowance.

Trim the sides and the top edge as shown below, leaving adequate seam allowance.

Next, unfold the fabric, and refold it the long way once. Cut a keyhole shaped hole, large enough to fit your hand in easily, but keeping the bottom fold of the bag in mind (so don't make the hole too far down, or the pins will spill out!)

This is what your fabric should look like once all the cuts are made, and completely unfolded.

Step Two- Bias tape-
sew the bias tape or ribbon to the edges of the keyhole opening. I machine basted the ribbon to the wrong side of the fabric first, then folded it over the edge of the fabric and sewed it to the right side, using a decorative zig zag stitch (which also helps the ribbon to lie flat and hold the opening open when completed)


Also sew a piece of bias tape or ribbon to the top edge of the back of the bag (I just basted it on)

Step Three- Assembly-
Next, bring the RIGHT SIDES TOGETHER, and sew along the edge seams of the bag, starting at the top of the keyhole opening to ensure evenness as you sew towards the folded bottom edge of the bag.

Here's the completed bag, inside out. Trim any ribbon/tape ends and thread, turn right side out, and...

Add the hanger and VOILA! Ready to go!

A nice full load of pins!
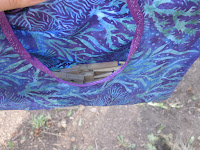
Sure beats struggling to stick the pins back on the line when your arms are full of clean laundry! :D

Friday, April 3, 2009
Quick seed starting pots!
Here is a great little project to make homemade (free!) pots for starting seeds in! (I can't take credit for this idea, it was originally in an issue of Mother Earth News, I am afraid I can't remember what issue). Save your empty paper towel and toilet paper rolls, they are definately good for something other than making silly kalidescopes!


Press the empty roll flat, and cut in half (in fourths for a paper towel roll). On the bottom edge, cut four 5/8" slits equally spaced around the tube (if pressed flat, cut through two layers right in the middle, then fold it so those slits are on the folded edges, and cut through again in the middle)
Fold the four flaps shut like you would a packing box, tucking the last one under the first one (so it stays shut on it's own, without the need of tape. Tape would hamper its drainage)
Fill with good soil and plant seeds in them! The great thing about them is when it comes time to transplant into larger pots or into garden beds, just unfold the bottom flaps and plant the whole thing (cardboard and all!) right into the ground. The cardboard will degrade, and before it does it helps retain moisture around the tender new roots! (However if it looks like the seedling is rootbound, just tear the cardboard away, it should be very soft from all the watering of the seeds you've done!) (by the way, to water them gently, we recommend a spray bottle) Here are some of our seedlings, the sugar snap peas are just about outgrowing their pots! 
Thursday, January 29, 2009
Welcome, me!
Well I've finally bit the dust and started an actual blog. I've had a livejournal for years, but have been seriously neglecting it as of late. Not to mention it's been an everythingandnothing sort of blog for me, much more like a diary than anything else, and is probably only interesting to me. I've wanted to start a 'real' blog for a while, I've admired many friends' blogs and wished I had one that at least had a theme or some sort of direction, but never really thought of anything that might be interesting to anyone else- until now that is! (wow, that does sound a bit conceited, but then again, I think all blogging is at least somewhat conceited...) So I've decided to make this blog (at least mostly) about my various crafting projects and general homemade activityness. I've always been into throwback crafting, things like knitting and sewing and more recently quilting, crafts that generally have an old lady stigma, but in reality have quite a strong following of younger people (and not just women). In recent years I've also delved into the worlds of food preserving, gardening, papermaking, bookmaking, candlemaking, all sorts of good stuff that is a ton of fun but also helps to lead me into a more sustainable lifestyle. Red (hubby) and I have dreams of homesteading, and though the age of claiming your land by simply building on it and fencing it are long gone (sadly...), the theories and activities of homesteading are still going strong, if not infact experiencing newfound interest, due to many factors (namingly the economy). For example, just about everyone we know did something homemade or handmade for Christmas gifts this year, and not just the standard tin of cookies. So all that being said, I figured a blog about handicrafts would be apropos of not only my life and lifestyle and interests, but might actually be something other people would find if not helpful, than perhaps interesting... Plus I just really like to write, and this gives me good direction.
There's also an underlying motive for this blog, and that is that I've been toying with the idea for a couple years now of opening a craft supply store and studio, so not just retail space but also offering classes and workshops, and workspace for projects, and all sorts of good stuff. In the past I haven't been the best boss of myself, and so partially this blog is hopefully going to help me stay motivated with my projects and act as a tool to measure just how dedicated to crafting I can be. Also, I'm hoping it can help me find even more direction for the shop, so I can figure out just what I want to do and offer with it. It would be a huge undertaking, starting a business -a REAL business- from scratch, but then again, any craft project is just that- creating something from nothing, and making it beautiful.
So for now, I'm going to share some past projects that I've done, and as I catch up on those, I'll share stuff I'm working on currently as well, and hopefully she'll grow from there. I'm not sure if this all will include how-to stuff or what, I guess that might be decided by what interest people have in my blog (if any). So if you do happen upon this blog, whether you're a fellow crafter or not, I'd love any feedback, on either projects or the blog itself or whatever else you'd like to see here. I want this blog to be for other people, not just for me (if you know what I mean). So in the meantime, while I try to catch up on taking photos of old projects and all that jazz, you can also find me on facebook, or on ravelry.com (I do still have a myspace but it has fallen to the wayside as of late).
Subscribe to:
Posts (Atom)