Wednesday, March 30, 2011

Here chickie chickie chickie!

Today we grew our family by a whopping 12 teeny little girls!  No, I didn't just have duodecuplettes (PHEW!), we got CHICKS!  12 adorable teeny fuzzballs, all Buff Orpington pullets (female chicks).  We've been planning for some time now to get chickens, but weren't sure if we wanted to go with day old chicks (like these) or juvenile pullets, or even if we could find laying hens locally, but after no luck of finding free hens, and no luck finding pullets of the breed we wanted, we decided to go with chicks!  And luck have it, the local feed co-op has Buff Orpingtons!  We picked them up this morning, and they are happily chirruping away in their brooder box in our living room.  They'll live in this box for at least the first few weeks, as they need constant heat heat heat!  The first week, we have to keep them at around 95 degrees!  Fortunately this is easily done with a couple 60 watt incandescent bulbs and some nice dry warm and insulating wood shavings for litter.


Bean and Tig are both absolutely entranced, clearly they think this is the best thing that has ever happened here... Though the chickies are nice and safe in there!  Wyatt is excited too, and all of our new favorite activity is just sitting and watching them!  I am so excited to watch them grow, get to know their personalities and quirks!  No names for them yet, for one they're very hard to distinguish from one another (and will continue to be, as their feathers will be in a constant state of change for the next few months!).  They will begin laying in about 5-6 months, so come early fall we'll be enjoying delicious eggs!  Three of the twelve will go to Red's mom when they are about 6 weeks or so, past the fragile chickie stage and well on their way to being big girls!  Buff Orpingtons are a heritage breed, originally bred in England in the late 1800's.  They're a heavy breed, hens reaching around 8lbs at maturity, and they will lay large light brown eggs.  They're very cold hardy, and have small combs and wattles (the floppy things on their heads), and that's a good thing cause the bigger the combs and wattles are, the more prone they are to frostbite.  Here's a shot of a mature hen- (borrowed from pluckandfeather.com) 

Thursday, March 10, 2011

Sprout-tastic!

This winter, we got a sprouting kit put together for us by Red's mom Kayla!  We both realized we missed salads and fresh greens SO badly, and storebought lettuce was remarkably disappointing after the awesome lettuce and greens we grew ourselves last summer.  Kayla has been sprouting for a long time, and helped us to get started with an awesome kit she assembled for us for Christmas.  Sprouts are delicious, crazy easy to grow, and amazingly nutritious.  It's a great way to get home grown nutrition in the winter!  Here is how we grow ours, but be sure to check out sproutpeople.org for everything you could possibly need to know about sprouting!  (They also carry seeds, sprouting equipment, all sorts of good stuff!)  

All we use to grow our sprouts are wide mouth quart sized mason jars with a small circle of non-metal window screen and the screw band that goes with the jar.  Other than seeds to sprout, that is all you need!  We have a great seed mix from sproutpeople.org that we LOVE that includes clover, arugula, cress, fenugreek and dill seeds.  It is the perfect mix, and tastes amazing on sandwiches, in burritos, and even by itself with a little dressing!  We tried sprouting mung beans, but didn't like the flavor, so now we stick to this seed mix.  To grow a quart of sprouts, it only takes about two tablespoons of these seeds, so it's a great value by volume!  

Step 1- Soak em!

First off, measure out your seeds according to the variety (different seeds will grow different amounts, so check on sproutpeople.org for how much to use so you get a good amount of sprouts but don't end up with an overstuffed jar).  Put the seeds in the jar, put the screen over the top and screw on the band.  Fill up the jar (through the screen) with cool water and let the seeds soak 8-12 hours (or however long is needed for the variety you are using, again, see sproutpeople for individual seed instructions).
Our favorite seed mix has some pretty small seeds, so we use two layers of screen until they begin sprouting and become big enough not to fall through the screen.

Step 2- Rinse, Repeat! 

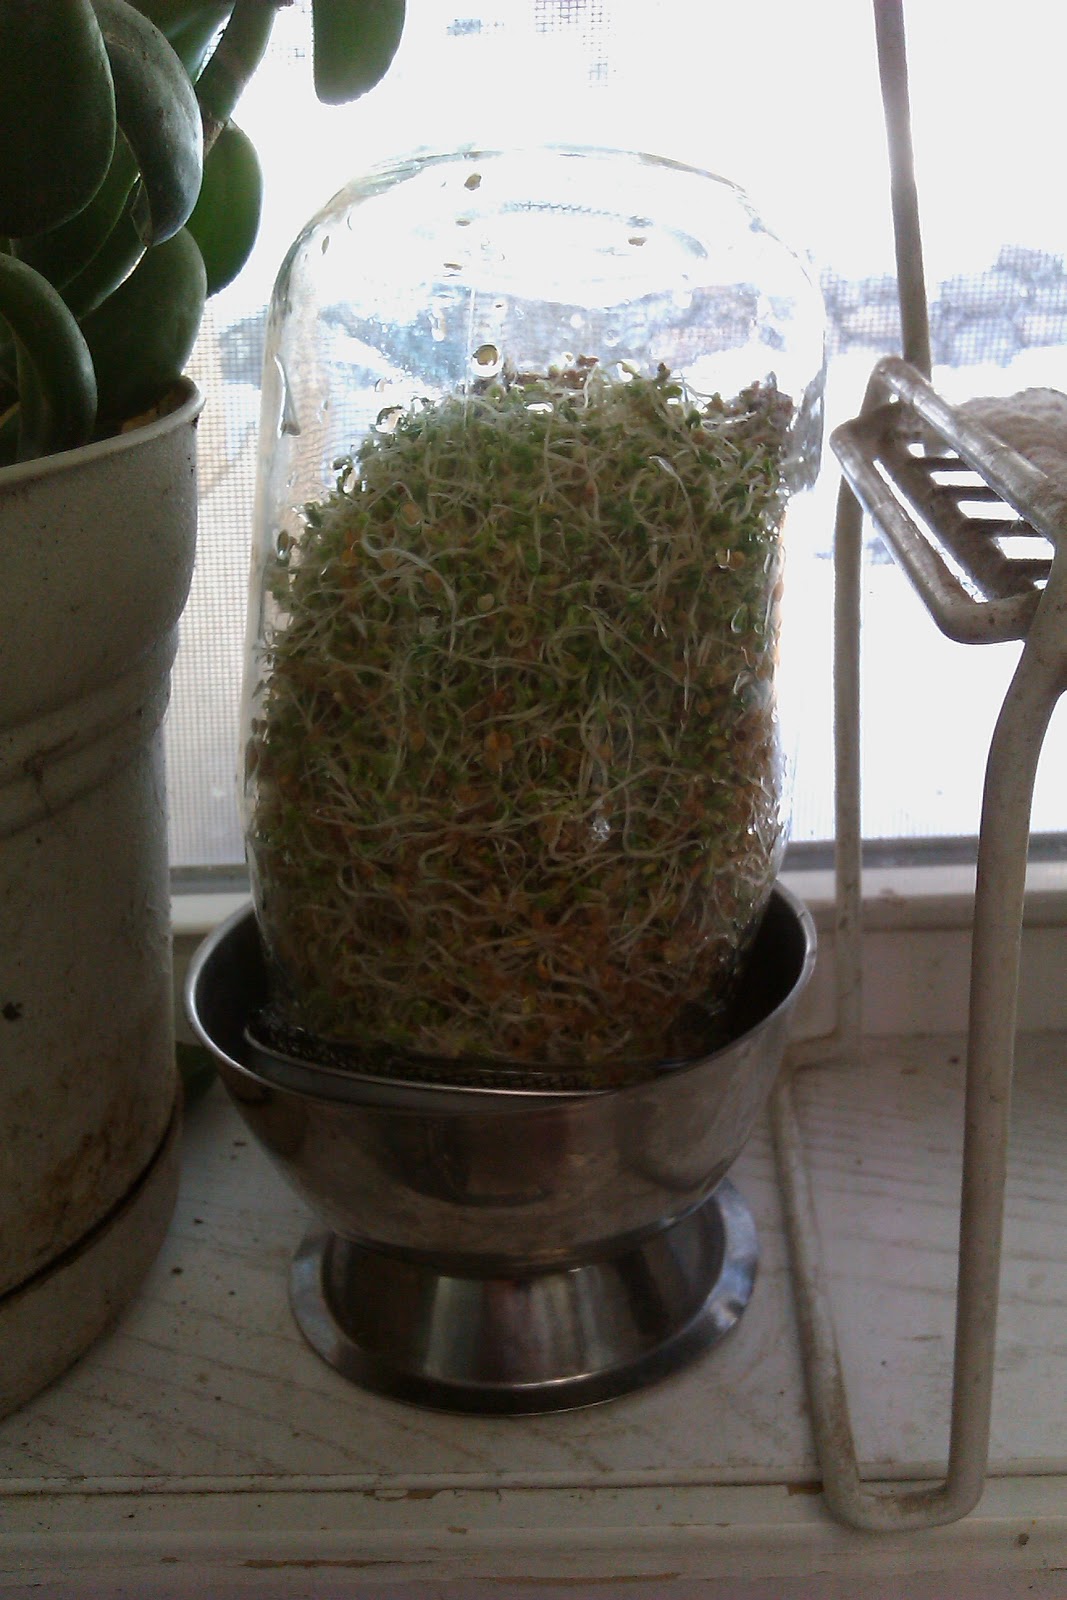
After your initial soak, drain the water out, fill with cool water, and swirl it around to make sure every little seed gets wet, then drain it off again, getting as much water out as you can.  Then tip the jar upside down and set it at an angle in a bowl, which will allow any leftover water to drain out without leaving the seeds too wet, and allow good airflow.  We keep ours on our kitchen windowsill, so we don't forget about rinsing them!  It doesn't get any direct sunlight this time of year so it's ok for us, but don't put your jars in direct sunlight.  I do recommend keeping them in or near the kitchen, so you'll be less apt to forget about them! 

   Rinsing; The first signs of growth, day 2

Repeat the rinsing and draining every 8-12 hours or so.  Doesn't have to be spot on timing wise, but you don't want the sprouts to dry out completely.  Since we keep ours by the sink, we usually rinse them in the morning while coffee is brewing, and again around dinnertime.  You will start to see the first signs of growth about 36 hours after you first put them up to soak (or sooner or later depending on the variety of seed).  At first the sprouts will be short, spindly and white, but once they get started, they really take off!  You'll notice the hulls of the seed start to fall off once the leaves start to form, around day 4-5.  
Here are our sprouts at about day 5. Notice the brown hulls of the seeds- they fall off on their own, but are still edible.  We don't bother with separating them out, though most end up in the bottom of the jar anyways.
We keep two jars going at different intervals to keep a steady supply of sprouts growing.  
These jars are at day 5 and day 2, respectively.

Step 3- Enjoy!

We've started eating our sprouts as early as day 4, but they are best when they've had a chance to get bigger and greener, around day 6 or 7.  We store our sprouts in the jars on the sill just like when they're growing, since they usually get eaten quite quickly.  But if you'd like to store your sprouts for longer, they will need one final rinse, then a thorough drying out (try a salad spinner or laying them out on a paper towel), and will need to be stored in an airtight container in the fridge (you could store them in the jar they were grown in, just replace the screen with the regular lid).  We've never gotten to that point, since we eat them too quickly!  They are amazing on sandwiches or in burritos or fajitas, and we've even eaten them by themselves in a bowl with a little dressing, like a micro-salad!  Wyatt even loves them, and stuffs them into his mouth by the handful!  They're so tasty, it's a wonder it took us this long to do our own sprouts!  Yum!


Tuesday, February 22, 2011

The other was served from a chafing dish...

Cheers to you if you know what song the title is from... Extra special Cheers to you if you know it and are not a Morgenstern! ;)  Anyways- A month or so ago, we were given some stuff from a friend's storage barn.  Among our new-to-us stuff were five chafing dish holding racks.  Our idea for them was to make a fabric basket liner for them, and use them for harvest baskets and around the house.  I finally figured out my new-to-me serger this weekend, and yesterday I made the first liner!  It's secured with ties so it can be removed for washing, and was really quick and easy to make once I figured out how to attach it to the bare bones wire frame of the chafing rack.


And in more fun with repurposing/reusing stuff, Red made me some new shelves in my laundry closet, out of timbers from Lost Mine Timber Co., his timber reclamation company.  Yay!!! (These timbers were reclaimed from the King Coal Mine)  Bet I'm the only housewife with historic reclaimed wood shelving in her laundry room ;)  I love the extra space, and the neatness of it, and I'm excited to find some nice containers for laundry detergent and lint and whatnot at garage sales this spring! (Need something nicer than an old Folgers can!)


Wow, it looks really nice in this picture!  Sure it's clean now; let's hope I keep it that way!  You can't see it, but there's a shelf on top of the cabinets with about three feet of vertical space above it, and there's quite a lot of stuff stored up there, pleasantly out of sight!  And now we each have a basket (on the top shelf in the pic) for our hats and gloves and whatnot! YAY for storage! Even though I can close the doors to it all, I don't want to because it looks so nice now!  

And just for fun, here's Wyatt helping Daddy make bread the other night!  (Who wants to make Red a bumper sticker that says "Real Men Bake"?)  

Monday, February 14, 2011

Happy Valentines Day!!!

Happy Valentines Day to you all!  I hope everyone's day has been wonderful!  Mine has been wonderfully mellow, thanks to my parents taking Wyatt to the rec center to swim and splash and have fun!  I took advantage of the me time and made myself a Valentines gift!  (But Red can take the credit) ;)  I used to love beading when I was a kid but haven't done any beadwork since I was probably 12 or 13 or so, and just last week I dug up my collection of beads that I had stashed in my shed.  I also found a cool bracelet kit out there, and decided why not make it!  And so I did!
 It was a lot of fun, and totally reignited my love of jewelery making!  So later last week, I decided to splurge a bit, and I bought some white freshwater pearls to make a necklace for myself! (But hardly a splurge, they were $7 at Walmart!)  So today, during my downtime I made myself this necklace!


I'm really excited to make more jewelery! I have a number of cool beads and stones and pendants from old necklaces that fell to disrepair or just could use some new life, and I'm excited to give them that new life!  I'm really thinking of making jewelery to sell on etsy or something similar, as it's relatively quick work and I have so many beads already (and therefore don't need to purchase much of anything to get going).  It's fun and satisfying work, and I'm so glad to be getting back into it! 

Sunday, February 13, 2011

A Chandler for the weekend!

No, not the character from Friends, a candlemaker!  I received a box full of candlemaking supplies, and decided this weekend to make candles!  I've done it before but not for years, and not with as nice supplies!  In the box (among many other things) was about 10 pounds of gorgeous beeswax, so we started out with that.  I absolutely love the smell of beeswax, and it burns so nicely!  We made some in molds, others in mason jars.  And it was a group project, as Trent, Sherry and John came over to hang out and help out!

Today, after taking the candles out of the molds, I decided why not keep at it, since we had all the equipment out anyways!  So instead of using fresh wax, we melted down all the random chunks and old pieces of candles we've saved over the years, sorted by color so we could try some layering!  Many of the bits and pieces were from scented candles, and combining them all made for some interesting and very nice new scents!


Wednesday, February 9, 2011

Orville Redenwhateverhisnameis ain't got nothin on me!

I don't know about you guys, but lately, we've been broke, so what doesn't get spent on bills goes to grocery essentials like milk and eggs, with no room for splurges on snack foods.  This is just fine with me, cause processed food only tastes good until you look at the ingredients label... (And if it still tastes good after that, well...)  So part of our new routine is coming up with yummy snacks from scratch.  We do variations on bread, and that's great, and I've tried making crackers and things, but nothing quite satisfies cravings for something salty and/or sweet and/or crunchy like kettle corn! (in fact it satisfies all three all at once!)  I don't really like buttered or plain popcorn, but kettle corn I could go nuts for (and do), but didn't know how to make it myself.  Sure, a package of microwave popcorn is super easy and quick, but it is not cheap considering what popcorn actually is... Plus who knows what weird stuff is in the microwaved kind (I don't know, since I don't have any on hand, but use your imagination)  After doing some research online and a few trial runs, I have successfully made the most awesome, delicious, addictive, and cheap snack food ever.  If you've never popped corn on the stove (and I don't mean in one of those UFO foil thingies), there is nothing to be scared of if you pay attention to what you're doing, and the end result is even better than the microwaved kind and takes the same amount of time.  And now, without further ado, but without a photo cause I ate it all before I could take a picture cause it was too damn good, my recipe for homemade kettle corn!

What you need-
A large sauce pot with a good fitting lid, preferably see through (the lid)
oven mits or potholders if the pot and lid have metal handles
about 1/4 cup vegetable oil (enough to completely coat the bottom of the pan, but not be deep)
1/4 cup popping corn
2-3 tablespoons white sugar
salt to taste

What to do-
Put the oil in the saucepan, and place three corn kernels in the pan, and turn on the heat (medium-high is good).  Wait until all three kernels pop, and pour in the rest of the kernels.  Holding the lid on tight, every 10 seconds or so lift the pot and shake it around to keep the kernels or any popped kernels from burning.  Once about half the kernels are popped, carefully pour in the sugar (but beware as kernels might fly out of the pot if you take the lid too far off.  It's best to have the sugar in one container that you can dump in all at once rather than dumping the sugar in a spoonful at a time).  Adding the sugar will slow if not stop the popping, but keep shaking the pot every few seconds to help distribute the sugar and keep the kernels and sugar from burning.  The rest of the kernels should pop within a minute or so.  When the popping slows to one pop every couple seconds (just like when you microwave popcorn), quickly dump all the popcorn into a bowl.  (It's not enough to take the pot off the heat, if you leave the popcorn in there the sugar will burn and so will the popcorn)  Sprinkle on some salt and stir the popcorn around with a spoon *IT WILL BE EXTREMELY HOT!!!* Don't burn yourself on molten sugar!  Let the popcorn cool a bit before you enjoy!  It will be so worth the wait!

That all may sound involved, but it really isn't!  The whole process takes maybe 4 minutes, and the end result is SO much better than anything out of the microwave!  You can fiddle with the amount of sugar and salt, and most recipes I found say to add the sugar at the same time as the kernels, but I found that adding it halfway through the popping practically eliminates any risk of burnt sugar, while still giving an even coating.  This recipe will yield a big bowl of popcorn, certainly enough for me and Wyatt to share, but if you're serving a crowd or just really really love popcorn, feel free to double it (but keep in mind you'll need a pretty big sauce pot).  I'm not sure how much one bag of microwave popcorn costs, but I have a feeling it's much much more than what this recipe costs, which I estimate to be around $0.10 total.  (The $2.50 bag of popping corn I bought yesterday yields 28 servings at 1/4 cup per serving (and I'm sure you can find popping corn for cheaper than that, but I happened to be in a specialty grocery store), which is $.08 per serving, plus a trivial amount of oil and sugar and salt, which I am generously valuing at $.02)  I can't think of ANYTHING that you can get a big bowl of for only ten cents... Not potato chips, not even flour or milk or bottled water or rice or anything!

And if you're a crazy person and don't like kettle corn (but I can't imagine why anyone wouldn't, especially not the homemade kind), you can always stick to plain ol' salt on your popcorn, or melt a little butter, or a personal fave of mine- nutritional yeast and Parmesan cheese!  (Seriously, if you've never had nutritional yeast on popcorn, do yourself a favor and go buy some! It is SO yummy (and not just on popcorn) and really good for you, lots of B vitamins!)

Now if they could only invent a popping corn that doesn't have the annoying shell of the kernel part that always gets stuck in your teeth... ;)

Wednesday, January 26, 2011

A simple life = a clutterless life?

Lately we've been talking about and trying to make some pretty huge life decisions.  Our big dreams in life all involve being debt-free, owning significant acreage, growing things, making things, and generally living a simple life.  We've realized that in order to make the first two dreams reality, we need to move.  Much as we LOVE where we live, it is just too dang expensive.  And the third part of our dream would be a lot more fulfilling and easier in a somewhat milder climate.  So while we haven't made final decisions on where and when, I've realized no matter where or when or how, we have way too much stuff to move out of this house.  I think about moving into a new house, and no matter if this hypothetical new house is larger or smaller than our current house, the thought of dealing with all the STUFF we have accumulated over the years makes me want to throw it all out in a pile in the backyard and light it all on fire.  Just get rid of everything, and start over from scratch!  Tempting as that might be, it wouldn't be very economically efficient.

Speaking of economic efficiency, I am a collector.  Not so much of nicknacky things anymore (though I definitely was as a kid, and couldn't possibly part with a small collection of my favorite childhood nicknacks that have special sentimental value), but of things that could some how, some day, be useful to me.  As a crafter, I think it's in my wiring to save things that I could use at some future date in some project, some piece of clothing that with a little tweaking could be just right, some scrap of fabric or bit of hardware or, well, you get the idea.  The intention behind it is always genuine, and if I would ever get around to using said item, would be very frugal of me, since I could make something out of it, rather than need to buy the finished product new, or the parts for said finished product.  But as wonderful as the intentions might be, my closets and cabinets and storage boxes would probably think otherwise.  Red is a culprit as well, but on an even larger scale, but fortunately the things he brings home for future use can generally be stored outside up at his shop (lumber, building materials, stove pipe, scrap metal, you name it he can find it for free).  This isn't all to say we don't eventually use this stuff- we do, and quite happily, just not at the same rate as we collect the stuff...

And not all our stuff is things for future projects- We of course have things like Wyatt's baby clothes and toys, books and old magazines, three drawers full of VHS movies we'll probably never watch again, all sorts of things... Our house is fairly small, and our closet and cabinet space is seriously prime real estate, but no matter how hard I try, it seems like all the flat surfaces in our house end up covered in STUFF.  Usually it's transient stuff, a box of things to be stored, papers to be filed, clean laundry to be folded... But it drives. me. nuts.  I am not a neat freak by any means, and generally I'm a pile person, but the clutter on the counters, tables, dressers, wherever, gets to me after a while.  It's so easy to just toss something on the counter or table, deal with it later, but when later comes around it's just like UGH... Clutter!

Getting rid of clutter is not easy for me to do.  I can totally understand how people turn out to be hoarders.  After all, everything has SOME value.  It might only be a few cents, but that's a few cents you wouldn't have to spend if one day you find you need that something and don't have it.  But it's not very condusive to a stress free and clean house... I am slowly but surely reteaching my brain not to get attached to objects as easily anymore.  It's not easy, but I'm working on it.  And one of the main ways I'm doing it is by thinking about moving.  Not only the physical part of packing it and hauling it and unpacking it (even paying someone else to do all that), which is enough to make me want to throw almost anything away, but also, I pretend that our future house is half the size of our current house.  That would be one heck of a small house!  Where on earth would you put everything?  While most small houses are pretty ingeniously designed to maximize storage in every possible nook and cranny, the thought of living in such a small house with all this stuff makes my skin crawl.  If we downsized our house by half, we'd have 650 square feet to eat, sleep, play, live, and bathe (Small as 650 square feet might be, I will not give up indoor plumbing just to save space).  To be able to do all that in such a small space really makes me question the value of every object I would bring in the door.

So with all that in mind, I am cleaning out our house.  I have gone through my closet and set aside all the items of clothing I haven't worn in a long time, or that don't fit quite right, or that aren't flattering or comfortable, or have holes or stains, and it's an impressive amount of clothing (and I don't have a very big wardrobe to pull from to begin with!).  I'm using up all the half used bottles of shampoo and conditioner and stuff I've stashed under my bathroom sink before buying anything new.  I'm going through all of Wyatt's toys, and eventually I'll go through his old clothes too (though I'm willing to bet that will be the hardest part for me).  Even going through our kitchen items and asking myself do we REALLY use this utensil/baking dish/pot or pan?  Even if we do use it, is it really worth the space it takes up if we only use it once or twice a year?  If we didn't have it, can we use something else in its place or is it really a specialty item?

What to do with all this stuff?  Like I said, it all has some value, and rather than toss things or give things away on freecycle or to the thrift store, first I'm going to try to squeeze as much of that potential value out of it all as I can.  I have set a goal for myself, to hold a yard sale on Memorial Day weekend.  Setting a concrete goal like that is really helping me stay motivated, and the thought of getting money (even if it is just a few cents or dollars) for all this stuff is really helping motivate me to find as much stuff to sell as possible!  In the meantime, all the things I find to get rid of, I'm storing out in my craft shed, since I can't really use it in the winter anyways, and since it probably wouldn't be warm enough to be out there a lot until after Memorial Day weekend anyways (specifically warm enough at night, since my sewing machine can't get too cold).  Any stuff that doesn't sell at the yard sale will go on freecycle and/or to the thrift store, cause there's no sense in not giving all this stuff a second chance with someone else!

And to all future items I might think would be useful somehow sometime in the future, I am making a firm 'what goes in must come out' rule with this house-  Besides food, any item that comes into this house must earn its spot here by some other item (preferably of equal size/type) giving up its spot for the new one.  This means, for example- any new clothing item must earn its hanger/drawer space by me getting rid of an old clothing item.  Fortunately (or unfortunately, however you want to look at it), we haven't been in much of a financial position to be buying any new anything, but this rule stands true even for items received for free, hand me downs or freecycle items or anything.  And I'm also doing my best to have a "touch it once" policy, where instead of just tossing the mail on the counter to deal with later, I sort it and deal with it right when I bring it in the house.  Hopefully, with a little luck and a whole lot of effort, when we do come to the time to pack up and move, the job will be a lot less stressful and a lot easier, and the time between now and then will be spent in a much neater, less cluttery house!  Wish me luck!!!